
Firewalling with netfilter/iptables
Introduction
iptables is Linux's firewall which has been a part of the kernel since version 2.4. It is often referred to as a packet filter as it examines each packet transferred in every network connection to, from, and within your computer. iptables replaced ipchains in the 2.4 kernel and added many new features including connection tracking (also known as stateful packet filtering). In this article we will use iptables to build simple but effective firewalls for the following scenarios using allow/disallow rules based on IP addresses, ports, and states:
- a standard home computer;
- a home/small office network with a single Internet connection;
- port forwarding for a home/small office network.
Rules, Targets, Chains, Tables, States, and all that jazz
iptables makes decisions on what to do with a packet based on rules that the system administrator creates. Data is passed through the Internet in the form of packets of information; connecting from your computer to a website will cause many packets to be exchanged in both directions. A rule specifies the criteria necessary for a packet to match it. A decision is known as a target and it can be a user-defined chain (not covered in this article) or one of the following:
ACCEPT
	Allow the packet through the firewall.
DROP
	Drops the packet; the packet is not allowed through the firewall
	and the sender of the packet is not notified.
There a number of other possible targets and we will cover some of these later.
Rules are grouped into chains which in turn are contained in
tables. There are three default tables which the packets may
traverse; we are only concerned with one of these right now: the
filter table. This is the default table and contains three
chains:
OUTPUT
	For packets generated by and leaving your computer; for example
	when you connected to the Linux Gazette's web site your browser
	created a packet and sent it out of your computer to the Gazette's
	server.
INPUT
	Any packets coming into your computer; for example the packets
	containing the Gazette's web page sent back by its server to your
	browser.
FORWARD
	For packets being routed through your computer; for example
	entering one network card and leaving through the other. We will
	cover this in more detail later.
The two other tables available by default are the nat table and the mangle table; we will use nat later for setting up a home network when only one network connection is available.
As I mentioned in the introduction, iptables is capable of stateful packet filtering. This means that we can create rules not only based on IPs and ports but also on whether a packet exists in any of the following states:
NEW
	The packet is trying to start a new connection; for example when
	you first connected to the Linux Gazette website your browser
	attempted to create a new connection with the Gazette's web server.
ESTABLISHED
	A connection that has seen packets travel in both directions; once
	the Gazette's web server replied to your browser the connection is
	established.
RELATED
	A packet that is starting a new connection but is related to an
	existing connection. An example of this is downloading a file over
	FTP. When you first connect to an FTP server you are creating a new
	connection to its FTP port. However, when you download a file from
	the FTP server using this connection a second new connection is
	made between your computer and the FTP server for the file
	download. Although it is a new connection it is related to the
	first. This stateful packet filtering is useful as this new
	connection does not use the FTP port and simple port based rules
	are not appropriate for this.
INVALID
	This packet is associated with no known connection. These packets
	should be dropped.
Creating and Storing Rules
Rules can be appended to the chains directly by using the iptables command. For example, to add a new rule to allow new connections to a web server running on your computer from anywhere we would execute the following:
$ iptables -A INPUT -s 0/0 -d 1.2.3.4 -m state --state NEW -p tcp --dport 80 -i eth0 -j ACCEPTwhere:
-s (or --src or --source) and -d (or --dst or --destination)
	is the source and destination specification of the packet. It is
	usually an IP address with an optional mask.

0/0 is shorthand for 0.0.0.0/0.0.0.0 meaning that the source can be any IP address.

1.2.3.4 is the IP our your machine and is equivalent to writing 1.2.3.4/32
or 1.2.3.4/255.255.255.255 meaning the destination must be this and only
this IP. Other examples include:

1.2.3.0/24
    Any IP in the range 1.2.3.0 to 1.2.3.255 (256 possible IPs). Could also
    have been written as 1.2.3.0/255.255.255.0

1.2.0.0/16
    Any IP in the range 1.2.0.0 to 1.2.255.255 (65536 possible IPs). Could
    also have been written as 1.2.0.0/255.255.0.0

! 1.2.3.0/24
	The exclamation mark inverts the match so this will result is a
	match if the IP is anything except one in the given range 1.2.3.0
	to 1.2.3.255.

-m state --state NEW
	matches only packets that have a status of NEW. This can be anyone
	of or a comma separated list of the four possible states.

-p tcp
	apply this rule to packets using the TCP protocol only. This can be
	anyone of tcp, udp, icmp or all (default). The exclamation mark can
	be used to invert the match.

--dport 80 (or --destination-port)
	matches a packet trying to connect to port 80. The exclamation mark
	can be used to invert this match also. A range of ports can be
	given in the format begin:end.

-i eth0 (or --in-interface eth0)
	name of an interface via which a packet is going to be received.
	Possible interfaces on your computer can be found using the command
	'ifconfig'. In this example your computer is connected to
	the Internet through the first (or only) ethernet card.

-j ACCEPT
	the target. In this case, if the incoming packet is creating a new
	TCP connection from anywhere to port 80 on your computer through
	the first ethernet card, we will allow it through.
Note that in all of the following examples I am assuming that your computer is connected to the Internet through an ethernet card. Change eth0 for wifi0, ppp0, etc., as appropriate for your computer. Furthermore I'm assuming that your computer's IP address is 1.2.3.4.
Obviously we do not want to set up the firewall manually everytime we boot the computer. Most Linux distributions will give you the option of having these rules loaded automatically at boot from a file; in fact most distributions will come with a preconfigured firewall as standard. The location of this file will vary from distribution to distribution but it should be easily found by executing locate iptables'. For RedHat or Fedora Core users it can be found at /etc/sysconfig/iptables.
The essential elements of this file are:
(I have added the line numbers for explanation - they should not appear in a file intended for use with iptables):
1 # Firewall configuration
2 *filter
3 :INPUT <target> [0:0]
4 :FORWARD <target> [0:0]
5 :OUTPUT <target> [0:0]
6
7 # your rules here
8
9 COMMIT
Listing 1 - The essential elements of an iptables file
Line 2 of this file tells iptables that the following rules apply to the filter table. The next three lines (3-5) define the default targets for the three chains. We place our rules after these and before COMMIT, which does just that; commits our rules to the firewall.
Each packet traverses the rules of the appropriate chain from the first to the last. If a packet matches a rule then it stops traversing the chain at that rule and its fate is decided by that rule's target. If the packet does not match any rule then its fate is the default target of its chain.
I would recommend using the following skeleton configuration for all your firewalls:
 1 *filter
 2 :INPUT DROP [0:0]
 3 :FORWARD DROP [0:0]
 4 :OUTPUT ACCEPT [0:0]
 5
 6 # allow local loopback connections
 7 -A INPUT -i lo -j ACCEPT
 8
 9 # drop INVALID connections
10 -A INPUT   -m state --state INVALID -j DROP
11 -A OUTPUT  -m state --state INVALID -j DROP
12 -A FORWARD -m state --state INVALID -j DROP
13
14 # allow all established and related
15 -A INPUT -m state --state ESTABLISHED,RELATED -j ACCEPT
16
17 # add anymore rules here
18
19 COMMIT
Listing 2 - Recommended skeleton configuration
I've set the default target for the INPUT and FORWARD chains to DROP, while allowing all outgoing connections (lines 2-4). On a standard server or home computer we should not be routing any packets as standard (we will later and we will look at this in more detail then). Any outgoing connections will come from our computer and we can generally assume that they are not a security problem. In contrast, all incoming packets should be treated as a security risk unless we have explicitly allowed them.
Line 7 tells iptables to allow all connections originating from the local loopback network interface. This is used by many applications to connect to local services and you must permit these connections. Lines 10-12 drop all connections with a state of INVALID.
Line 15 should be self explanatory - it allows all incoming established or related connections through the firewall. For a connection to become established or related it must first have had a state of NEW and have been allowed though the firewall via a matching rule (had it not been allowed through it would have been dropped by default and could not result in an established or related connection).
Scenario 1: Standard Home Computer
For the standard user using his/her home computer for Internet browsing, e-mail, etc. then the above firewall is all that is needed as it allows all connections out while preventing any connections that are not related.
For a more paranoid user that wants to control and log all outgoing connections we might use a firewall configuration such as the following:
 1 *filter
 2 :INPUT DROP [0:0]
 3 :FORWARD DROP [0:0]
 4 :OUTPUT DROP [0:0]
 5
 6 # allow local loopback connections
 7 -A INPUT -i lo -j ACCEPT
 8
 9 # drop INVALID connections
10 -A INPUT   -m state --state INVALID -j DROP
11 -A OUTPUT  -m state --state INVALID -j DROP
12 -A FORWARD -m state --state INVALID -j DROP
13
14 # allow all established and related
15 -A INPUT -m state --state ESTABLISHED,RELATED -j ACCEPT
16 -A OUTPUT -m state --state ESTABLISHED,RELATED -j ACCEPT
17
18 # allow connections to my ISP's DNS servers
19 -A OUTPUT -d 2.3.4.10 -m state --state NEW -p udp --dport 53 -o eth0 -j ACCEPT
20 -A OUTPUT -d 2.3.4.11 -m state --state NEW -p udp --dport 53 -o eth0 -j ACCEPT
21
22 # allow outgoing connections to web servers
23 -A OUTPUT -d 0/0 -m state --state NEW -p tcp --dport http -o eth0 -j ACCEPT
24 -A OUTPUT        -m state --state NEW -p tcp --dport https -o eth0 -j ACCEPT
25
26 # allow outgoing mail connections to my ISP's SMTP and POP3 server only
27 -A OUTPUT -d 2.3.4.5 -m state --state NEW -p tcp --dport smtp -o eth0 -j ACCEPT
28 -A OUTPUT -d 2.3.4.5 -m state --state NEW -p tcp --dport pop3 -o eth0 -j ACCEPT
29
30 # log all other attempted out going connections
31 -A OUTPUT -o eth0 -j LOG
32 # default is to DROP out-going connections
33
34 COMMIT
Listing 3 - Paranoid home user
This configuration denies all connections by default and only allows those we explicitly define rules for. Line 16 adds a second rule based on the established or related rules for outgoing connections. Just as with line 15, this is necessary as the default rule of the OUTPUT chain is DROP. Also note that when we specifying the interface for the OUTPUT chain rules we use -o (or --out-interface) as opposed to -i.
The first rules we have added (lines 19 and 20) are to allow outgoing connections to your ISP's DNS server; I am assuming your ISP has a primary and a secondary DNS server with IPs 2.3.4.10 and 2.3.4.11 respectively. These connections are essential so your computer can convert a domain name (such as www.linuxgazette.net) into its IP address; without that conversion we would not be able to connect to the website. DNS lookups are usually done via the UDP protocol. Unless you are doing anything out of the ordinary this should be sufficient.
The next two rules (lines 23 and 24) allow your Internet browser to connect to any website using both the normal and the encrypted protocols. You'll notice that I have used http and https to specify the ports here instead of 80 and 443. This makes the rules more readable and you can substitute the service name for any port so long as it appears in the file /etc/services. You should also notice that in the second rule I omitted the destination IP mask; this is equivalent to writing 'match any destination IP' (-d 0/0). Lastly, I could have turned these two rules into one using:
-A OUTPUT -m state --state NEW -p tcp -m multiport --dport http,https -o eth0 -j ACCEPT
Another standard operation that a home computer would be used for is e-mailing. E-mailing requires two services: SMTP to send mail and POP3 (or IMAP in some cases) to receive mail. I have added a rule for each of these (lines 27 and 28) where I am assuming that your ISP uses the same server for both (2.3.4.5). In most cases your ISP will not give you the IPs of its mail servers, but instead their domain names; e.g. mail.my-isp.com. We can rewrite these rules using this as follows:
-A OUTPUT -d mail.my-isp.com -m state --state NEW -p tcp --dport smtp -o eth0 -j ACCEPT

-A OUTPUT -d mail.my-isp.com -m state --state NEW -p tcp --dport pop3 -o eth0 -j ACCEPT
It is generally a better idea to use IPs wherever possible.
The final rule has a target we have not come across yet: the LOG target. This logs the details of a matching packet. You can review the log with the dmesg command or via syslogd. Some distributions have a utility called logwatch which will format these reports into an e-mail sent to the root account. The LOG target is a non-terminating target; the packet will continue traversing the chain. So in the above example we log all outgoing packets that have not matched one of the rules, that packet continues traversing the chain and as there are no other rules, the default target for the OUTPUT chain is used (DROP).
If you use any other services, such as Jabber, IRC, file sharing clients, etc., you will have to add rules for these also. Just follow the above example. If you don't know what ports to open and you can't find it in /etc/services, then add a logging rule at the beginning of the rules, e.g.
-A OUTPUT -i eth0 -j LOG
and examine the output of the command dmesg (look for the destination port, DPT=???). I also feel I should mention that filtering the OUTPUT chain in this manner can be quite problematic; you might find some programs hanging or freezing while they try and establish connections you never thought of allowing, or using the UDP protocol instead of the TCP, etc. Unless you really want or need to lock the OUTPUT chain down, it might be just as easy to set the default rule to ACCEPT and then block the outgoing connections on a case by case basis.
Scenario 2: Home Network with a Single Connection
Most home users and small offices connect to the Internet via a single dial-up, ISDN or broadband (DSL) connection. This scenario covers the problem: 'I only have a single network connection, but I would like all my computers to have Internet access. How is this possible?' The examples in this scenario will enable you to set up a home or office network using your networked computer as a gateway for your other computers.

Figure 1 - Author's Home Network
My own situation is depicted in Figure 1; I have a single broadband connection with a static IP address (1.2.3.4) connected to eth0. My second ethernet card (eth1) is a wireless PCI card. In my home there are two laptops, each also with wireless cards built in.
The first issue is that every computer on the Internet needs to be uniquely identifiable by an IP address. Irrespective of whether you have a dial-up or a broadband connection, you will only have been assigned one IP address. This can either be static (some broadband ISPs will allocate you a single IP that will not change) or dynamic (you will be assigned different IPs every time you reconnect to the network). When you send out a packet it includes the destination address and the source address. Although we can send a packet with any source address, only replies to ones with your source address will return to you.
Now we must assign an IP to every network interface on the network. In the case of eth0, it was assigned by my ISP. But what IPs will we give the wireless interface and the laptops? ICANN (Internet Corporation For Assigned Names and Numbers) has assigned certain blocks of IPs for use in private networks. One of these blocks is given by the IP mask 192.168.0.0/255.255.0.0. Which IPs of this set you choose to use is entirely up to you. As you can see from Figure 1, I have assigned 192.168.0.1 to my wireless PCI card, and 192.168.0.2 and 192.168.0.3 to the laptops.
The nat (network address translation) table of iptables allows us to use one IP address for many different computers and works as follows: if the first laptop tries to connect to a website it sends a packet with the source address of 192.168.0.2 to eth1 of the networked computer. The networked computer will then forward this packet from eth1 to eth0. Just before the packet is transmitted, the nat table will change the source address from 192.168.0.2 to 1.2.3.4. iptables will automatically remember that it did this and when the reply packets arrive with a destination of 1.2.3.4 and change it to 192.168.0.2, routing it through eth1 to the laptop.
Let's begin with the firewall configuration:
 1 *filter
 2 :INPUT DROP [0:0]
 3 :FORWARD DROP [0:0]
 4 :OUTPUT DROP [0:0]
 5
 6 # allow local loopback connections
 7 -A INPUT -i lo -j ACCEPT
 8
 9 # drop INVALID connections
10 -A INPUT   -m state --state INVALID -j DROP
11 -A OUTPUT  -m state --state INVALID -j DROP
12 -A FORWARD -m state --state INVALID -j DROP
13
14 # allow all established and related
15 -A INPUT   -m state --state ESTABLISHED,RELATED -j ACCEPT
16 -A OUTPUT  -m state --state ESTABLISHED,RELATED -j ACCEPT
17 -A FORWARD -m state --state ESTABLISHED,RELATED -j ACCEPT
18
19 # allow connections to my ISP's DNS servers
20 -A OUTPUT  -d 2.3.4.10 -m state --state NEW -p udp --dport 53 -o eth0 -j ACCEPT
21 -A OUTPUT  -d 2.3.4.11 -m state --state NEW -p udp --dport 53 -o eth0 -j ACCEPT
22 -A FORWARD -d 2.3.4.10 -m state --state NEW -p udp --dport 53 -i eth1 -o eth0 -j ACCEPT
23 -A FORWARD -d 2.3.4.11 -m state --state NEW -p udp --dport 53 -i eth1 -o eth0 -j ACCEPT
24
25 # allow outgoing connections to web servers
26 -A OUTPUT  -d 0/0 -m state --state NEW -p tcp -m multiport --dport http,https -o eth0 -j ACCEPT
27 -A FORWARD -d 0/0 -m state --state NEW -p tcp -m multiport --dport http,https -o eth0 \
	-i eth1 -j ACCEPT
28
29 # allow outgoing mail connections to my ISP's SMTP and POP3 server only
30 -A OUTPUT  -d mail.my-isp.com -m state --state NEW -p tcp -m multiport --dport smtp,pop3 \
	-o eth0 -j ACCEPT
31 -A FORWARD -d mail.my-isp.com -m state --state NEW -p tcp -m multiport --dport smtp,pop3 \
	-o eth0 -j ACCEPT
32
33 # log all other attempted out going connections
34 -A OUTPUT -o eth0 -j LOG
35 -A FORWARD -j LOG
36 # default is to DROP out-going connections
37
38 COMMIT
39
40 *nat
41
42 # set up IP forwarding and nat
43 -A POSTROUTING -o eth0 -j SNAT --to 1.2.3.4
44
45 COMMIT
Listing 4 - Home/office network with NAT
As well as demonstrating NAT, this example also introduces the use of the FORWARD chain. The networked computer is now also working as a router; as well an nat-ing the packets from the laptops, it is also routing them from eth1 to eth0 and vice-versa. As such we have adding another ESTABLISHED,RELATED rule on line 17, this time for the FORWARD chain.
Similarly, on lines 22,23,27,31, and 35, I have added in lines to allow the same connections we were allowing previously to come from the FORWARD chain. However, there is one big security risk here: I have not specified any source address. Anyone within range of the wireless network can assume an unused IP and use your broadband connection. We would prevent this by changing line 27, for example, to:
-A FORWARD -s 192.168.0.2 -d 0/0 -m state --state NEW -p tcp -m multiport --dport http,https \
	-o eth0 -i eth1 -j ACCEPT
-A FORWARD -s 192.168.0.3 -d 0/0 -m state --state NEW -p tcp -m multiport --dport http,https \
	-o eth0 -i eth1 -j ACCEPT
and similarly for the rest of the rules.
The iptables NAT-ing magic happens in the nat table with one rule:
-A POSTROUTING -o eth0 -j SNAT --to 1.2.3.4
It's as simple as that! Almost. IP forwarding is disabled in the kernel by default and you must execute the following to turn it on:
$ echo 1 > /proc/sys/net/ipv4/ip_forward
You can place this line in the iptables startup scripts (usually /etc/rc.d/init.d/iptables) or, preferably, in the /etc/rc.d/rc.local script which is the last script executed during startup.
What if you are using a dynamic IP? Simply change line 43 to:
-A POSTROUTING -o eth0 -j MASQUERADE
This is a special case where the source IP of the outgoing packets are changed to the IP of the outgoing interface; i.e. the IP of eth0. This can be used for a static IP as well but you are advised to use the appropriate version for your set-up.
Using the wireless network as depicted will also require setting the essid and mode parameters of the wireless card. The essid is simply a one-word name for the wireless network. The mode in this example will be Ad-Hoc as opposed to Managed (usually the default) as the network cards are communicating directly as opposed to using a base station. These settings can usually be configured with the following commands:
$ iwconfig eth1 essid barry_home

$ iwconfig eth1 mode Ad-Hoc
(replacing eth1 with eth0, wifi0, etc. as appropriate.
This scenario will work just as well if your set-up is a more typical small office set-up as depicted in Figure 2.
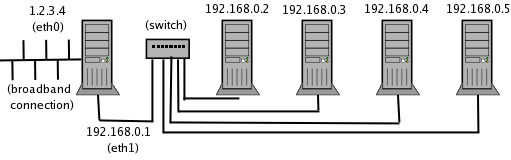
Figure 2 - Typical small office network
In this case the networked computer is connected to a port on the switch or hub through eth1, and all other office computers are each connected to one of the other ports. The exact same firewall configuration as that in Listing 4 can be used.
Required network settings for this configuration
To be able to access the Internet using NAT a number of network configuration settings are required by each computer; the DNS server(s) IP address(es), the gateway IP, subnet mask and an IP address. For the networked computer these will all be supplied by the ISP; let's assume that the ISP provided the following:
IP address:1.2.3.4Subnet mask:255.255.255.192Primary DNS:2.3.4.10Secondary DNS:2.3.4.11Gateway:2.3.4.1
The settings for each of the computers using NAT will then be:
IP address:192.168.0.???Subnet mask:255.255.255.0Primary DNS:2.3.4.10Secondary DNS:2.3.4.11Gateway:192.168.0.1
Note that the gateway for the NAT-ed computers is the second network interface of the networked computer.
Scenario 3: Port forwarding
For the last scenario, let us imagine that instead of hosting your web server on the firewall machine you want to host it on one of the others, say 192.168.0.3. Let us also assume that you're using the Jakarta Tomcat web server which listens on port 8080 by default. Can we use iptables to forward all requests from the firewall to the web server, and to forward all the responses back through the firewall to the originating request? Absolutely and, again, we can do it through the magic that is NAT.
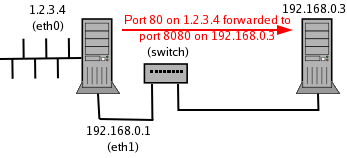
Figure 3 - Port forwarding
There are two types of NAT; source NAT (SNAT) and destination NAT (DNAT). Scenario 2 used SNAT where we altered the source address of the packets coming from our internal network. This scenario will use DNAT to change the destination address of packets coming into our networked machine from the Internet.
This can be accomplished by adding one simple line (44) to our firewall:
40 *nat
41
42 # set up IP forwarding and nat
43 -A POSTROUTING -o eth0 -j SNAT --to 1.2.3.4
44 -A PREROUTING -i eth0 -p tcp -d 1.2.3.4 --dport 80 -j DNAT --to 192.168.0.3:8080
45
46 COMMIT
Listing 5 - Port forwarding
Ensure you have enabled the kernel's IP forwarding when using the nat table. Now all connections originally bound for port 80 on our networked machine will be forwarded to port 8080 of 192.168.0.3.
Last Remarks
One type of connection we did not cover was 'pings'. If you are running a server it is generally a good idea to allow echo-requests pings through the firewall using the following rule:
-A INPUT -p icmp --icmp-type echo-request -j ACCEPT
You can use the -s option to limit the source IPs that are allowed to ping your machine.
Lastly, a common misconception among many people is that a firewall is "the last line of defence". It is not. It is only the first line of defense in what should be a properly secured, configured and up-to-date machine.
Community Disclaimer
This article is intended as introduction to iptables with practical and useful examples. It is nothing more and nothing less.
More Information
The best place for reading more on iptables and firewalling is the iptables homepage. It contains many how-to documents and tutorials:
http://www.netfilter.org/
And, as always, the man page for iptables gives a quick overview of the default options and tables.
If you found this article interesting then you might be interested in looking up some of the other features of iptables:
- the
mangletable; used for specialised packet alteration - the string module; allows rule matching based on strings occurring anywhere within the data payload of a packet
- time-based rules; allows rules based on time of day and day of week
- tarpits; allows you to "catch and hold" connections from potential hackers, using up their resources but not your own
- control over limits on quota and bandwidth usage
- randomising; match packets randomly. Can be used for load balancing with DNAT, to simulate a faulty connection, etc.
Barry has been using Linux since 1997 and his current flavor of choice
is Fedora Core. He is a member of the Irish
Linux Users Group. Whenever he's not doing his Ph.D. he can usually be
found supporting his finances by doing some work for Open Hosting, in the pub with friends or running in the local
park.
![[BIO]](../gx/authors/odonovan.jpg) Barry O'Donovan graduated from the National University of Ireland, Galway
with a B.Sc. (Hons) in computer science and mathematics. He is currently
completing a Ph.D. in computer science with the Information Hiding Laboratory, University
College Dublin, Ireland in the area of audio watermarking.
Barry O'Donovan graduated from the National University of Ireland, Galway
with a B.Sc. (Hons) in computer science and mathematics. He is currently
completing a Ph.D. in computer science with the Information Hiding Laboratory, University
College Dublin, Ireland in the area of audio watermarking.
