
How To Make a StereoGram with GIMP, Blender and StereoGraph
1. Introduction
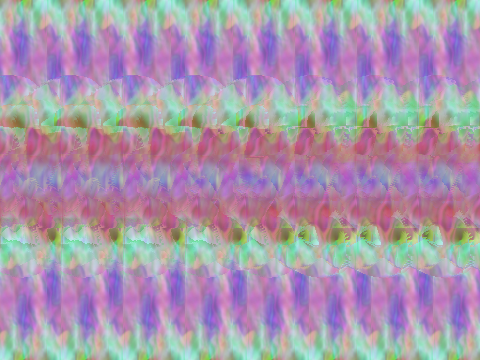
Do you see what I see?
Single Image Stereograms (SIS) are two-dimensional images that seem to be three-dimensional; these 3-d images appear to "pop up" (or "pop down") out of the printed paper. The amount of training the typical human nervous system requires to see such images seems to vary from person to person; it seems to help if you are old and myopic! This tutorial is not about that however; it is about creating the images that will invoke the 3-d image in the eye a trained beholder. I will explain how I created such a stereogram of (what is to me) a beautiful mathematical entity called "Borromean Rings". The techniques described are sufficiently general that readers should be able to create their own images. In particular, the reader may want to construct a depth map for something else like a trefoil knot or a fish.
The history of how I got interested in stereograms is at the end (see section 6) of this document.
1.1 Software Required. If you have a basic Debian setup (with XFree86) that is connected to the Internet, then all you need to do is execute the following command as root:
apt-get install gimp blender stereograph
In other words, you need to install the software packages: gimp, blender, and stereograph, in addition to a basic Graphical Desktop (XFree86) installation.

You need to start the GUI and then start gimp or blender running as applications within the GUI. This is usually as simple as starting a terminal and typing gimp or blender as the case may be. Depending upon the sophistication of your interface you can probably also get them under the "Graphics Applications" menu.
2. Creating the Rings
The 3-d modelling program Blender is an excellent contribution from the NaN Company and the Blender Foundation to the community. It is capable of far more than the construction of depth maps as described in this document. Excellent tutorials are available on-line, or as downloadable documentation. Start at the Blender community site for more...
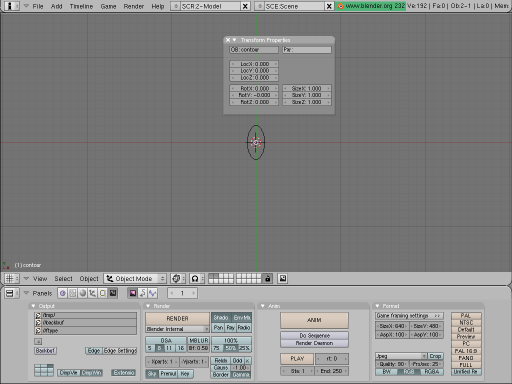
We first start blender and create an empty scene in it. This is done by typing Ctrl-X in blender and accepting the offer to erase all objects. This creates a scene with a cube (selected), a camera, and a lamp. You can further type a twice to select all objects, then type x to delete all selected objects. Finally, accept the offer to erase the cube, lamp, and camera. As a result we become bold adventurers who are traveling light without a lamp or camera!
Traveling Light-less
We will now (approximately) follow the tutorial given in the section on "DupliFrames" in the blender manual to create the "rings".
First press space to activate the menu to add objects. Select a "Curve" of type "Nurbs circle" and press the enter key. Unless you have moved the "3-d cursor" in blender,1 this should be inserted with its center at the origin of the co-ordinate system. Now we scale it by a factor of 2 in the y direction by typing s, y, 2 and entering. This is the central "path" of the ring.
Follow the circular instruction
Next we add the curve that is the "contour" of the surface. Go to the object mode by hitting Tab. As before, press space to get the object addition menu, and select another "Curve" of type "Nurbs circle". Scale this surface to a reasonable size by typing s, 0.25. Finally, to avoid confusion, rename this curve to "contour" by typing n, and then edit the name by selecting it with a left mouse button click.
Now we return to object mode with a tab and select the original y-stretched circle. Get to the edit menu by typing F9. Under the menu "Curve and Surface" there is an entry called "BevOb". Select it and enter the name of the other curve, i.e. "contour" if you followed the last step of the previous paragraph. The y-stretched circle will now be used as a "path", and the contour will be "extruded" along it making a ring. To finish things off, select the "contour" with the right mouse button, grab it by typing g, and shift it 10 steps to the right and "out of sight" of the camera by typing x followed by entering 10.

Give me a ring
To create the two other copies of the ring we go as follows. First select it with the right mouse button and make a linked duplicate by typing Alt-d. Then rotate it by 90 degrees by typing r and entering 90. Shift to the "side view" by typing the 3/PgDn key on the Number-Pad. Again rotate by 90 degrees by typing r and entering 90. Now shift to the "front view" by typing 1/End on the Number-Pad. Make another copy by typing Alt-d and rotate it by 90 degrees by typing r and entering 90. Go back to the "top view" by typing 7/Home on the Number-Pad and then rotate again by 90 degrees by typing r and entering 90.
To get a better view of the rings we first place the 3-d cursor at the origin. Then type . (period or dot) to get the rotations to be about the 3-d cursor (which is at the origin). Select all the rings one by one as follows: select the first with a right mouse button click and select each of the others with a right mouse button click with Shift pressed. Now rotate by 45 degrees around the z-axis by typing r followed by entering 45. Then shift to the front view by typing 1/End on the Number-Pad; again rotate by 45 degrees, this time around the y-axis, by typing r and entering 45. Go back to the top view by typing 7/Home on the Number-Pad and switch to the "solid" view by typing z.
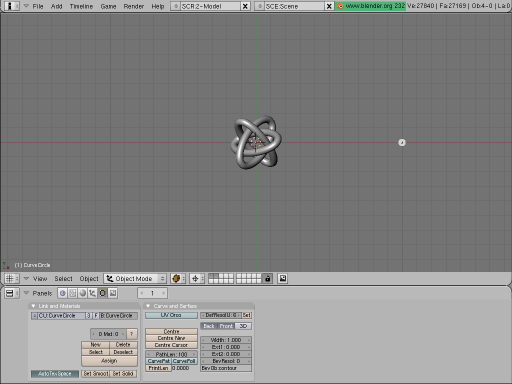
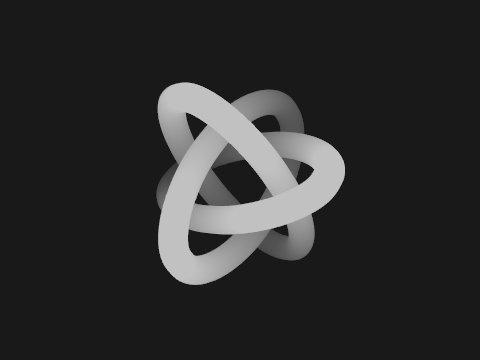
Borromean Rings at last
3. Rendering the depth map
The brain does create a 3-d "feeling" out of the image rendered above but it is not really a "pop-up" 3-d image. For that we have to create a depth map version of the image. In blender this is done using a texture. A texture is attached to a material so we must add material first.
Type F5 to obtain the Materials and Textures menu. The select the default Material by clicking the button next to the button marked "ADD NEW" under the "Material" menu. You may also select a new "Material" with "ADD NEW". Now, the last menu on the right is the "Textures" menu. If the Default texture is already added then there will be a small "tick" mark next to a button that says "Tex". Otherwise select the default "Tex" texture with the button next to the "ADD NEW" button in this menu; alternatively add a new texture if there is none. Now select the leopard-skin" like button that has a helper-pop-up which says "Texture buttons". A new set of menus appears. In the "Texture" menu in this panel select the "Blend" texture.
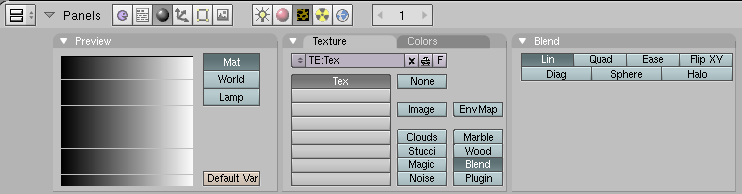
Let it flow...
Go back to the "Material" menus and buttons by selecting the red "sphere" that has a helper-pop-up which says "Material buttons". Select the "Map Input Menu". This menu allows us to select the input data that is used to determine the variation in material that forms the texture. Select the "Glob" button that makes the "Global" co-ordinates the input data for the texture. Further select the first "Z" button (next to the "sizeX" slider). Select the blank buttons next to the "sizeY" and "sizeZ" sliders. This says that the texture maps the z co-ordinate of the object to the x co-ordinate of a linear "blend".
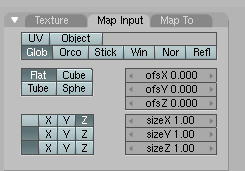
If what goes in is right...
Now we select what this linear blend is output as. Go to the "Map to" menu at the extreme right. Deselect "Col" (for Colour) and select "Emit" in order to make the texture emit light in proportion to its z co-ordinate (which is the co-ordinate that measures the distance from the camera). We also click the "No RGB" button (which sometimes shows up as "No RG" due to lack of screen space) so that the blending is just a grayscale from black to white.

The relevant material
We still do not have a camera to view this! We should be in the top view, if not then shift to it by typing 7/Home on the Number-Pad. Place the 3-d cursor at the origin (make sure it is the origin in all views!). Now add a camera with space and then select "Camera" in the menu that appears. Go the front view and raise the camera 10 steps in the z direction by typing g followed by z and then entering 10. We need to set the background to a uniform dark gray. You will notice a new set of menus. Click the numbers next to "HoR", "HoG" and "HoB" in the "World" menu and set these to "0.1" by entering 0.1. If you type F12 now you will see a depth map which we need to tweak just a little more.
First of all we improve the rendering. Type F10 to bring the "Render" menu. In this menu deselect the "Shado(w)", "EnvMa(p)" and "Gamma" buttons. Select the rendering to at least "75%" in order to see things more clearly. Most importantly click the "OSA" (for the over-sampling/anti-aliasing) which will cause the rings to be smoother. Finally select the output format in the "Format" menu to be "Targa Raw" instead of "Jpeg" (the default). Also click the "BW" button since we know the output is a grayscale.

Render it with a Blender
This will give a reasonable depth map. However, you may wish to improve it a bit more. I felt the "black" in the rings was too dark and so I made the material emit a little more light by increasing the "Emit" slider in the "Shaders" menu up to 0.2. Further, the "ofsX" slider was brought up to 0.3 and the "sizeX" slider was taken down to 0.7.
All rings are gray at night
When you are satisfied with the rendering, go to the "File" near the top left corner of the blender window and "Save Image". You may want to "Save" the .blend file as well. I will assume below that you have saved the image as borromean.tga; moreover, I will assume that the image is of size 640x480 which is the default size.
4. Creating the background texture
The GNU Image manipulation program is an absolutely marvelous program. I can (and have) played with it for hours! We will put this very versatile program to the limited use of creating a nice background texture for the stereographic image.
We open gimp. With the "File" menu or by typing Ctrl-n we create a canvas of size 640x480. One way to quickly create a texture of the type we need is to select the "Fill" tool from the "Tools" menu or by typing B. Then choose a nice flat pattern like "Leopard", "Rain" or "Sky". From the "Tool Options" dialog we then select "Pattern Fill" and fill the canvas with this pattern.
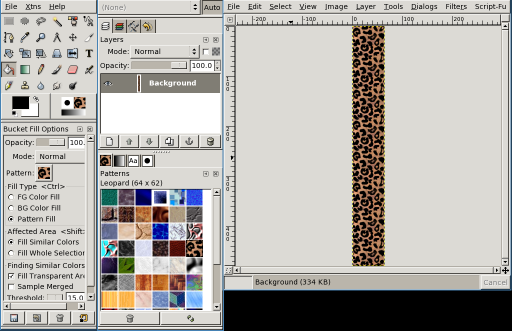
A leopard-skin pill-box
Now save the pattern as texture.png using the "File" menu or using Ctrl-S.
5. Using stereograph
The stereograph command line program can generate a number of different types of stereograms. Even transparent ones that contain two images in one! We will create a rather simple stereogram with the command:
stereograph -R -a -t texture.png -b borromean.tga -o stereo.png
A brief explanation of these options is in order. The -t option clearly indicates the file that contains the texture while the -b option indicates the file that contains the depth map; finally the -o options indicates where the output should go. The -a options tells stereograph to enable "anti-aliasing" and the -R option is an experimental one to get rid of "artefacts".
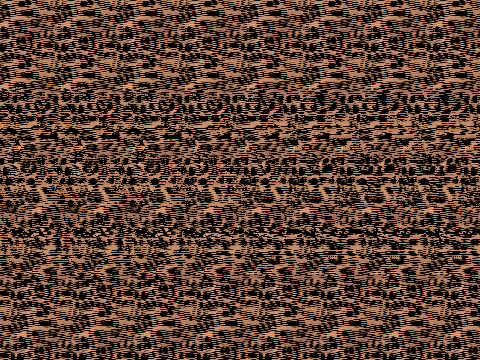
A three ring circus, perhaps
If you find it difficult to "see" stereograms you can add the option -A which will put two triangles in the image that will assist the viewing. That's it! The file stereo.png is a stereogram image file. You can view it with your favourite image viewing software or you can even open it in gimp to view it.
6. Afterword
I first learnt about Single Image Stereograms (SIS--which are also known commercially as MagicEye(TM) images) because of the gift to me by my sibling of a MagicEye book. Initially I appreciated the beautiful textures that were on the glossy pages of this book, but could not verify the claim of the creators that there were three-dimensional images that would "pop out" of the page. One day my aged ancestor chanced to see the cover of the book and said something like "What a strange elephant!" It is only then that I tried to see the images and was successful (Thom's morphogenesis sometimes acts extremely locally).
There are numerous sources of information (especially on the World Wide Web) on how these images "work". On reading these and attempting to create some on my own it became clear to me that the GNU Image Manipulation Program GIMP is an excellent program to create the textures. For a while there was also a GIMP plugin which would create the SIS images from a texture and a depth map. This was replaced quite soon with the excellent stereograph program. However, for a long while I could find no reasonable way to create the depth maps short of writing a program for each such map or some other form of "hacking". Whenever, I looked at 3-d scene creating software the mention of "raytracing", "textures", "lighting" and "rendering" would confuse me terribly--I'm a mathematician and not a physicist after all! Another barrier was the fact that the most popular such software povray was considered "non-free" by Debian. I had no wish to invest time and effort learning to use a program that could perhaps become unavailable to me at some point in the future.
Sometime last year I chanced upon blender, its excellent manual, and more than a few tutorials for it. Thanks to the documentation, the terms above acquired a "real" mathematical meaning. Indeed it became clear to me that blender could become for 3-d drawing what xfig already was for 2-d. Since the latter was already on my list of great graphics tools I decided to learn blender at the next available opportunity. This opportunity was the decision of our Institute (IMSc) to create a logo for itself through a "contest". While the logo "material"-ised quite nicely with (and without!) blender I still could not get the depth maps that I was looking for. It was only by repeatedly reading the blender manual for explanations on "lighting", "material", "texture" and "rendering" that I finally chanced upon the method that is described here.
The end result has been this tutorial on creating a 3-d SIS image of the Borromean Rings. Since writing this I have learnt from the "Linux Artist" site that there are many more 3-d drawing tools like blender.
As a teacher who comes from a family of teachers I cannot prevent myself from giving a few exercises:
- Beyond the Event Horizon:
- Make your own stereogram of something else using some other Open Source tools. There's More Than One Way To Do It!
Non-Mathematical:- Find all the references to artists of the 70's, 80's and 90's in this text.
Mathematical:- Find out more about Borromean rings, trefoil knots, Nurbs and other mathematical entities mentioned in the text.
Footnote:
1. In other words, don't even touch your mouse unless you really need to go somewhere!
![[BIO]](../gx/authors/kapil.jpg) Kapil Hari Paranjape has been a ``hack''-er since his punch-card days.
Specifically, this means that he has never written a ``real'' program.
He has merely tinkered with programs written by others. After playing
with Minix in 1990-91 he thought of writing his first program---a
``genuine'' *nix kernel for the x86 class of machines. Luckily for him a
certain L. Torvalds got there first---thereby saving him the trouble
(once again) of actually writing code. In eternal gratitude he has spent
a lot of time tinkering with and promoting Linux and GNU since those
days---much to the dismay of many around him who think he should
concentrate on mathematical research---which is his paying job. The
interplay between actual running programs, what can be computed in
principle and what can be shown to exist continues to fascinate him.
Kapil Hari Paranjape has been a ``hack''-er since his punch-card days.
Specifically, this means that he has never written a ``real'' program.
He has merely tinkered with programs written by others. After playing
with Minix in 1990-91 he thought of writing his first program---a
``genuine'' *nix kernel for the x86 class of machines. Luckily for him a
certain L. Torvalds got there first---thereby saving him the trouble
(once again) of actually writing code. In eternal gratitude he has spent
a lot of time tinkering with and promoting Linux and GNU since those
days---much to the dismay of many around him who think he should
concentrate on mathematical research---which is his paying job. The
interplay between actual running programs, what can be computed in
principle and what can be shown to exist continues to fascinate him.
