
Songs in the Key of Tux: Audacity

As noted in last month's Mailbag, I was unable to write "Songs in the Key of Tux" last month. My intention was to take a look at Linux-based recording software, but I was disheartened by some work-related RSI in my left arm - which is pretty important to a right-handed guitarist - and by an accident which befell Dan, my drummer.
The beat, as any self-respecting musician will know, is central to any form of music; and any attempt to record without a beat as a guide will be pretty disastrous - especially if, like me, you tend to use a lot of tempo changes. My efforts at creating my own drum tracks in Songwrite haven't been very impressive, so I was relying on Dan to provide this essential piece.
Dan is recovering nicely after a car crash which left him with a cracked vertebra. He even managed to fulfill the "Spinal Tap" drummer requirements by dying (clinically) not just once, but twice! While he is itching to get back on to a drum stool, or even to use a drum machine, I'm not going to trouble him for another few months - luckily I managed to find another way of covering recording software.
I was initially approaching the idea of covering recording software as a means of fulfilling my ambition to record some of my own music, and was about to jump in at the deep end, and start using Ardour. Ardour is a complicated piece of software, which can more or less match ProTools in terms of features. (For those who don't know, ProTools is the equivalent of a full recording studio in software. Most albums produced since the late 90s have used ProTools at some stage of the recording process).
Audacity

Ardour is overkill for most projects. There are, however, several pieces of software for less ambitious projects. Audacity is a cross-platform audio editor with multi-track capabilities. It is capable of meeting the needs of a musician new to the recording process, but it is also suitable for "everyone else".
Most people find themselves in need of good audio editing software on occasion, and Audacity can meet most, if not all, of these needs. For common tasks such as adding a simple voice-over to a video, while keeping the original soundtrack, to removing the needle hiss from vinyl recordings, Audacity has built in features for most audio editing tasks.
I'm going to cover a few simple examples this month. I came across a few files my brother, Joe, dumped from his portable studio, a Zoom PS-02, and got plenty of opportunities to demonstrate some simple audio editing tasks.
The Zoom PS-02 is a pocket sized digital 3-track recorder. It stores its data on Smart Media cards, and Zoom provide a Windows-based executable to convert the tracks to wav files. As far as I recall, it runs fairly well under Wine; but I didn't have to trouble myself with trying it out, as Joe provided me with converted files.
I have found LGPLed source for a WinAmp plugin to play these files, courtesy of Randy Gordon. I even attempted to make it into an XMMS plugin, but I no longer have any sample files. I've included it, in case anyone wants to give it a try, but bear in mind that I'm not a C programmer, and that the code is probably infested with bugs.
Basic editing
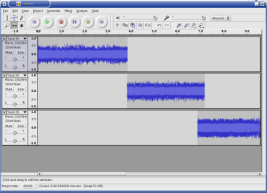
The first step in editing an audio file is to import the track. Go to "Project->Import Audio", or type Ctrl-I, and select the file you wish to work on. Each imported file is given its own track, or pair of tracks in the case of stereo files. As is customary with audio editing software, each track has a set of controls to the left of the screen. Here you will find the volume and panning controls, underneath the track name. On the left of the track name is an icon to close the track, on the right is an arrow. Clicking on this arrow gives a menu of operations which may be performed on the file. If you wish to edit stereo tracks individually, you can choose "Split Stereo Track" from this menu.
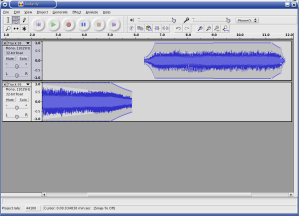
If you just want to combine the tracks recorded using another recorder, such as the PS-02, you can simply import each track, set the panning and volume, and enjoy the result. If you're not going to do too much editing on a track, I recommend you don't save the project - Audacity's projects can get very large, very quickly. I also recommend you don't export directly to .ogg or .mp3 - these files are only exported as mono. Instead, export to .wav, and use oggenc to encode it. I learned this the hard way, creating the file pictured in the screenshot above!
Editing Tools

The first tool you may find useful when editing is the "Selection Tool". In the tool palette, pictured to the right, this is on the top left, and is selected by default. With this tool, you can click on an area of song to hear playback from that point, or select an area to play back that area only, or to apply an effect, or to use one of the other tools. The selection is highlighted in grey, and you may increase or decrease its size by placing the mouse pointed at either side, along the vertical. The mouse pointer changes to an arrow, pointing towards the outside of the selection.
For this article, I have been performing some basic tasks on a recording
of my band jamming, which Joe made around two years ago. The track is
improvised, so I wanted to cut out each distinct part - we're not likely to
use anything from it, but, it's better to have the parts rather than having
to site through all 15 minutes of it, should we change our minds. This is a recording of a simple
selection.
As well as this, you can use selections to remove parts of the sound you don't want. If you don't want the part you've selected, choose "Edit->Silence" (Ctrl-L); to remove the rest of the sound, apart from what you've selected, choose "Edit->Trim" (Ctrl-T)
For this situation, where several of the parts are similar, it's best to cut out the repetition of parts, and join together separate pieces. The best method I found is to copy each part containing similarities to a new window ("File->New", as you might expect), select an example, and duplicate that part of the track - "Edit->Duplicate", or Ctrl-D. Once I have my parts, I can remove the original portion, and use the "Time Shift Tool" (bottom centre in the palette) to move each part closer to each other - otherwise I would be left with silence. You can click here to hear what that sounds like (though I wasn't very careful in my editing).
Having separate pieces blend into each other like that obviously isn't
the best approach, so next I turned to the "Envelope Tool" (top centre).
Although there are plug-ins which can fade in out out selected areas, the
Envelope Tool allows you to draw volume increases or decreases with much
greater control. Again, you can click
to hear how this sounds. Still rough around the edges, but a definite
improvement, in my opinion.
So, we've covered three of the tools available, but that leaves three remaining. Of these, the "Multi Tool" (bottom right) will probably become the most useful as you gain experience with Audacity, as it combines the functions of the other tools, followed by the "Zoom Tool" (bottom left). The Zoom Tool allows you to get a closer look at the samples - useful for getting better selection. With the Zoom Tool selected, the left mouse button zooms in, right zooms out, and middle returns to normal view; though it's worth noting that zooming can be done from the keyboard (Ctrl-1, Ctrl-3 and Ctrl-2, respectively).
The one tool I don't see myself having any use for, however, is the "Draw Tool". This, at an appropriate zoom level, lets you alter individual sound samples. I can see how this could be useful, for fixing the pitch of notes, etc., but I don't see myself using it, somehow.
Closing words
Here ends my quick tour of editing with Audacity. Next month, I'll go over the basics of recording. Audacity has a built in metronome, so if I stick to something simple, I should be set. I'm chomping at the bit to start recording, especially since Joe bought a Washburn Dime333 - one of the nicest guitars I've ever held.
If anyone has any feedback, feel free to mail it to me, though if you have any tips to offer, it would be better if you sent it to The Answer Gang.
After my last article, I received mail from Bob van der Poel, author of CountBeats and MMA - Musical MIDI Accompaniment, asking if I'd take a look at his software. I'd seen MMA before, but lost the address. MMA generates a MIDI file from a text file, which a musician can use as accompaniment in the absence of another musician. Input specifies the tempo, metre, and the chord progressions, and MMA generates music from it. Having seen music generators before, I was slightly wary, but MMA's generated music is very, for want of a better word, musical.
I was equally impressed with CountBeats, which is a useful tool for the music theory illiterate such as myself. Tap on your keyboard, and it tells you what tempo you're using. A simple idea, and one that really shouldn't be necessary, but I've had to avoid making tablature for a couple of songs because I simply couldn't get the tempos right.
I also received mail from Cameron Horsburgh, who wrote to inform me about a capability of Lilypond which I'd overlooked:
I was also interested in your comment about using Songwrite to write articles via Lilypond and LaTex. I don't know if you're aware of the lilypond-book feature in Lilypond. This is a great feature. You can put a block of Lilypond code in a LaTex or html file, run lilypond-book over it and end up with music fragments in your piece of work.
So instead of writing articles inside Songwrite, I would export the Lilypond code, place it in a block in a LaTex file, and run pdflatex (or whatever). And of course, it works the same for web pages too!
Something else that I noticed is that, because Songwrite is written in
Python, the file handling code is able to accept URLs (though this only
works on the command line). So if you type songwrite
http://somehost/somefile, Songwrite will fetch it from the Internet
for you and open it.
Here are some files to try this out with: 11Apr04.sw.xml, 17Jun04.sw.xml, 18Jun04.sw.xml, 29March.sw.xml, 3April04.sw.xml, 4April04.sw.xml, 8Apr04.sw.xml
As a final note, anyone wishing to learn music theory or the guitar, or anyone who feels they can teach something about them, should bookmark the free textbooks on music theory and guitar being written at Wikibooks. They're works in progress, but are showing some promise.
I'd also like to plug Utopia Banished, my favourite Magnatune band; and having found some of the Irish songs of my teens on the net, would like to point to them. 'Til next month!
Jimmy has been using computers from the tender age of seven, when his father
inherited an Amstrad PCW8256. After a few brief flirtations with an Atari ST
and numerous versions of DOS and Windows, Jimmy was introduced to Linux in 1998
and hasn't looked back.
In his spare time, Jimmy likes to play guitar and read: not at the same time,
but the picks make handy bookmarks.
![[BIO]](../gx/2004/authors/oregan.jpg) Jimmy is a single father of one, who enjoys long walks... Oh, right.
Jimmy is a single father of one, who enjoys long walks... Oh, right.
