
Microprocessor Simulator on Linux
By Hrvoje Deak, Jonathan Magtalas and Matt Edwards
Introduction
There have long been three options in developing, testing, and debugging microprocessor applications.
For hobbyists and enthusiasts, the simple and probably the most frustrating way of developing an application was to write and download the program code into the microprocessor, plug the microprocessor into the circuit, and hope it works. Needless to say, you could find yourself spending most of your development time debugging and downloading the program back into the microprocessor, over and over again.
If you were developing a slightly more advanced application, you might invest some time into acquiring and learning simulation software. This technique allows to you to see if the code used for your program does as it's expected, on a nice and easy to follow graphical user interface, where registers, memory, and program execution can be viewed. Then, once you feel the code is correct, you would perform the option above: Plug and pray. However, the lack of any interaction with actual hardware during development and debugging means that how the program performs and executes on simulation software may be different from how it performs in a real-world application.
Finally, if you were serious about developing microprocessor applications in a reasonably short amount of time, you could invest in an in-circuit emulator that actually gives you an idea of real-world performance. However, priced in the thousands of dollars, this option is well out of the means for the average microprocessor enthusiasts.
We present a fourth option — using your regular IBM PC to run simulation software that controls real hardware in real time, through the parallel port. This has been achieved under Linux, and simply could not have been achieved under Windows due to lack of access to I/O ports.
We decided to implement this solution using the PIC16F84A, a popular processor for hobbyists with a simple instruction set that can run reasonably advanced applications
The difficult bit - The hardware interface
We found plenty of good quality microprocessor simulators for a wide range of microprocessor families. However, as mentioned above, the lack of any hardware interaction was seen as a major drawback, when developing an application. What was the solution? The parallel port on the PC was seen as an input and output device that had enough I/O pins to be able to provide enough support for the 13 I/O pins on a PIC16F84A. (For our simulator, we don't need the two oscillator inputs, as the clock timing is done in software.) However, it is not as easy reading and writing data to the parallel port as we originally thought: In the more recent versions of Windows, access to I/O ports on the PC is virtually non-existent, without a hack. In Linux, there is a better way.
First, allow the program to run as a root application:
 su - root               # Become root, give password when requested.
 chown root your_program # Make root the enabling program's owner.
 chmod u+s your_program  # Set the SUID bit.
Then, access the I/O ports at the beginning of your program, and remove root privileges:
   /*--- Set access to the ports.*/
        if (ioperm(0x378, 3, 1))
                perror("Failed ioperm lp0 on") ;

        /*---  remove root privileges.*/
        setgid( getgid() ) ;
        setuid( getuid() ) ;
For more information, read P.J. Radcliffe's article in Linux Gazette's March 2005 edition ("Linux: A Clear Winner for Hardware I/O").
However, hardware interaction through the parallel port was only one feature that we wanted to provide. To properly simulate a real-world application, using the parallel port as a substitute for the PIC16F84A's I/O ports, we also wanted to make the simulation be able to run in real-time.
Typical PIC16F84A applications run off a 4 MHz clock. That translates to a 1 MHz instruction rate. This means 1000 instructions every millisecond. With release of the Linux kernel 2.6, we could achieve 1 millisecond time slicing, which gave us our best chance of running an application in real time. In our tests on an 800Mhz Pentium 3 laptop, the amount of time the instruction execution (1000 instructions) take out of the 1 ms. time slice is about 50%.
Reading and writing to the parallel port after every instruction that accesses the processor's I/O is infeasible: Perfect real-time simulation could not be done. However, we could achieve what we dubbed pseudo-real-time, that is, we run as many instructions as needed in the 1 ms. time slice the Linux kernel gives our program, and then perform the reading and writing to the parallel port: input pins are read and output pins are written to. This meant that, in the time, all the instructions were executing in the 1 ms. slice, if an output pin went from a 0 to a 1 and then back to 0, the end result would be that the parallel port pin representing this PIC16F84A pin would not see the change. That is why we call it pseudo-real-time.
Software side
We wanted the simulator software to have an easy-to-use graphical interface. One thing lacking from many microprocessor simulators we found on the Net was a quality user interface. The ability of these programs to actually simulate a microprocessor was unquestioned; however, we felt that users need a program that not only runs correctly but also makes life easier for a microprocessor developer through its GUI.
For our GUI design, we decided to use Qt Designer, an open source (for non-commercial products)[1] and easy-to-use IDE that uses the Qt graphics library to help users build effective designs. Coming from a predominantly Windows programming background, we found Qt Designer to be very powerful, and, in many ways, very similar to Visual Studio .NET — which made the learning curve very gentle.
Using Qt Designer also fell into line with another of our project's goals — being an open source project. We decided early on that by making the simulator open source, we could use GPL code and allow users who had an understanding of programming to make their own changes to our software where they see fit.
Being able to use GPLed code made our job easier, and huge thanks must be given to Scott Dattalo, the creator of GPSIM. GPSIM is an open-source microprocessor simulator that simulates the entire PIC family of processors. Our project took the PIC16F84A emulation out of GPSIM, and used it for our back-end code. Also, our thanks go to P.J. Radcliffe, an RMIT academic, whose article in Linux Gazette on hardware I/O under Linux (March 2005) and accompanying software (a program called lptty_start) helped us access the parallel port under Linux, and made the job of reading and writing to the parallel port a whole lot easier.
A typical example
Now, we will go through a simple application that uses our simulator's features. Here is a simple segment of code that flashes an LED on and off (really fast) from Port A, pin 0 on the PIC16F84A:
list    p=16c84
  __config _wdt_off


include "p16c84.inc"

        org     0

        goto    start
        org     4

start:
        bsf     status,rp0
        movlw   0x10
        movwf   trisa ; set low 4 bits of port a to output

        bcf     status,rp0
here:

        call    turnon
        call    turnoff
        goto    here

turnon:
        movlw   0x01
        movwf   porta ;move 1 to bit 0 of port a

        return

turnoff:
        movlw   0x00
        movwf   porta ;move 0 to bit 0 of port a

        return

        end
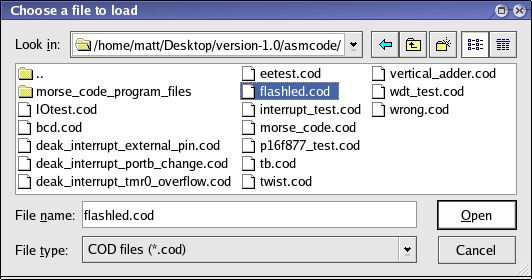
The ASM code has to be compiled using an external compiler. We recommend GPASM, an easy-to-use free compiler. To load this file into our simulator, click on the open icon in the toolbar. This will open up a file open dialog, from which you can select either a .hex file or a symbolic .cod file. It is considered better to load the COD file, because it has more information associated with it, such as symbol names for variables declared in your source code and actually being able to view the original ASM source code.
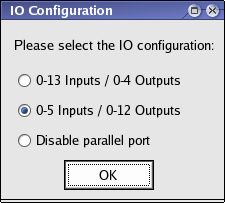
Once you've selected a file, another dialog pops up to show what kind of parallel port configuration you want. You have the option of being able to use 0-13 inputs and 0-4 outputs, or 0-5 inputs and 0-12 outputs — or not use the parallel port (if its not required). For the above application, we will use the second option (5 inputs/12 outputs).
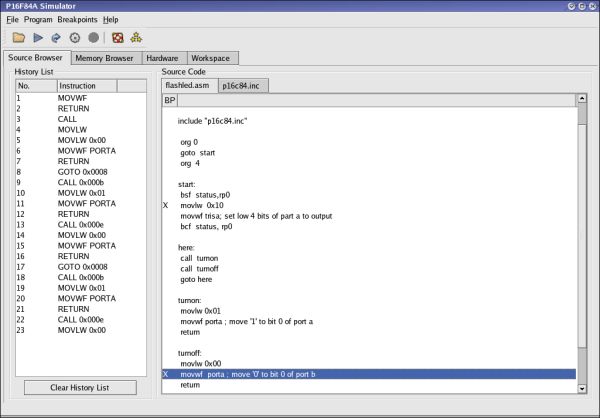
Once loaded, you can see, under the source code tab, that there are two components: a history list that shows the most recently executed instructions, and a source code viewer that shows the associated ASM file with the program. By double-clicking on a line of source code, you can add and remove breakpoints to a particular line of code. When executing, a program will stop when it hits a breakpoint, and this feature can be used to view the state of the PIC16F84A program during execution.
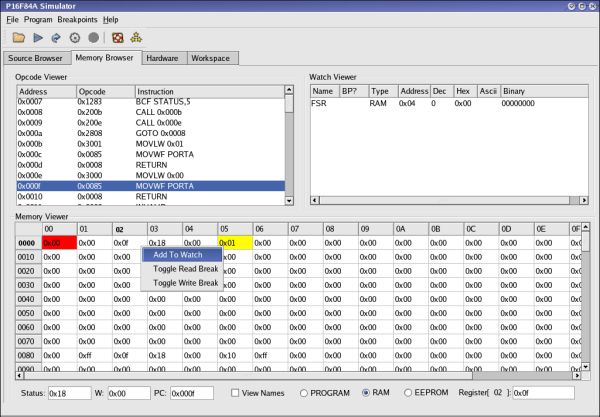
By clicking on the memory viewer tab, we can see three components. First, we can view the program opcodes in the memory browser tab, under the opcode viewer component. The current instruction is highlighted. When executing a program in single-step mode, the highlighted line changes with each instruction step. The opcode viewer shows the memory address where the instruction is located, the 'hex' representation, and the disassembled (ASM) representation of the code.
Also located under the "Memory Browser" tab is a memory viewer (bottom half of tab). This graphical component allows users to view/modify the value of memory. Users can view register memory (RAM), program memory, or EEPROM memory of the PIC16F84A, by selecting the appropriate radio button on the bottom of the page. They can also add break points on the reading and writing of registers. This is indicated by a yellow and red background on the register, respectively.
Another simulator feature to aid viewing what really happens during a PIC application's execution is the Watch Viewer. It allows the user to right-click on a memory location (in the memory viewer tab), and, from the menu that pops up, select to add a 'watch' to a memory location. For instance, if you want to view an general purpose register that your program uses as an important variable, you can add a 'watch' to it.
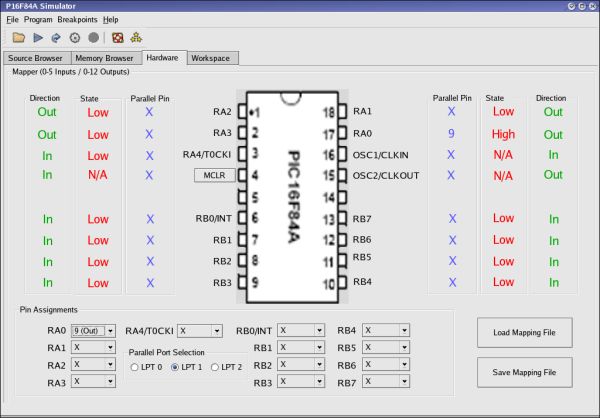
 The third tab, the Hardware tab, is where you can specify the
mapping between PIC16F84A pin and parallel port pin. To map a pin
to one on the parallel port, you click on the drop-down box associated with
that pin, and select which parallel port pin you want the PIC pin
to be mapped to. For instance, in our above program, if you
wanted Port A Bit 0 (pin 17 on the PIC chip) to be mapped to
parallel port pin 9, you would click on the drop-down box next to
RA0, and select the number 9. Now, any change in the value of RA0
will be reflected on this parallel port pin. By connected an LED
to this parallel port pin, we can run the PIC application. (Also,
note that your parallel port mapping configuration can be saved and
loaded to file).
The third tab, the Hardware tab, is where you can specify the
mapping between PIC16F84A pin and parallel port pin. To map a pin
to one on the parallel port, you click on the drop-down box associated with
that pin, and select which parallel port pin you want the PIC pin
to be mapped to. For instance, in our above program, if you
wanted Port A Bit 0 (pin 17 on the PIC chip) to be mapped to
parallel port pin 9, you would click on the drop-down box next to
RA0, and select the number 9. Now, any change in the value of RA0
will be reflected on this parallel port pin. By connected an LED
to this parallel port pin, we can run the PIC application. (Also,
note that your parallel port mapping configuration can be saved and
loaded to file).
The mapping of parallel port pins to PIC pins can be saved or loaded to files, by clicking the corresponding buttons at the bottom right-hand corner of the screen.
We can run the program in full-speed mode, by clicking on the run-icon in the toolbar. We stop execution in full-speed mode, when breakpoint is hit or the user clicks on the stop icon in the toolbar. We can also run in single step mode where we run one instruction at a time, by clicking on the step icon. The user can choose to step over an instruction that they do not want executed, by clicking the step-over icon.

Conclusion
If you interested in downloading our software, our project can be found on sourceforge.net. The project name is Microprocessor Simulator on Linux.
[1] Rick Moen comments: Because Qt Designer's licence restricts usage, albeit certainly generous and relatively benevolent for a proprietary software package, it is actually under what would be termed a "viewable source" or "source-available" licence, and not a genuinely open source one. Fortunately, that doesn't prevent using it to create open source works of your own, as you've illustrated in the article.
Hrvoje Deak
![[BIO]](../gx/authors/deak.jpg) Hrvoje Deak is in his final year of a double degree in Computer Systems
Engineering and Computer Science. A final year project on developing a
microprocessor simulator helped explore his interests in software
development and microprocessors. Hrvoje has only recently become an avid
Linux user and in a short amount of time has used Redhat 9, Mandrake 10 and
currently has Fedora Core 2 installed on his home PC.
Hrvoje Deak is in his final year of a double degree in Computer Systems
Engineering and Computer Science. A final year project on developing a
microprocessor simulator helped explore his interests in software
development and microprocessors. Hrvoje has only recently become an avid
Linux user and in a short amount of time has used Redhat 9, Mandrake 10 and
currently has Fedora Core 2 installed on his home PC.
Jonathan Magtalas
![[BIO]](../gx/authors/magtalas.jpg) Jonathan is currently studying in the final year of a double degree
majoring in Computer Science and Computer System Engineering at RMIT
University in Melbourne. He has taken quite an interest towards Software
Engineering in languages such as C, C++ and Java. Jonathan discovered
Linux in his studies and is currently involved in a 3 semester project
developing a Microprocessor Simulator on Linux interfacing with the
parallel port. Jonathan has Fedora Core 2 installed on his PC at home and
uses it frequently to work on various projects.
Jonathan is currently studying in the final year of a double degree
majoring in Computer Science and Computer System Engineering at RMIT
University in Melbourne. He has taken quite an interest towards Software
Engineering in languages such as C, C++ and Java. Jonathan discovered
Linux in his studies and is currently involved in a 3 semester project
developing a Microprocessor Simulator on Linux interfacing with the
parallel port. Jonathan has Fedora Core 2 installed on his PC at home and
uses it frequently to work on various projects.
Matt Edwards
![[BIO]](../gx/authors/edwards.jpg) As part of an eternal quest for knowledge, Matt Edwards is studying for a
computer science and computer systems engineering double degree at RMIT
University in Melbourne. Matt developed an interest in Linux midway through
his degree when he discovered how much better it was than Windows. He now
scoffs at anyone who even mentions the 'w-word'. Aside from computers, he
has a few hobbies including energetic pursuits such as athletics, cycling
and downhill skiing.
As part of an eternal quest for knowledge, Matt Edwards is studying for a
computer science and computer systems engineering double degree at RMIT
University in Melbourne. Matt developed an interest in Linux midway through
his degree when he discovered how much better it was than Windows. He now
scoffs at anyone who even mentions the 'w-word'. Aside from computers, he
has a few hobbies including energetic pursuits such as athletics, cycling
and downhill skiing.
