
![[picture of mechanic]](../gx/adam/mechanic.png)
Hello there, dear readers. How have you all been? Not too busy I trust. I on the other hand have been busy over the last month or so. I have just completed my A-level exams, which I found to be quite tiring. That was why I was unable to write the Weekend Mechanic last month. For those of you who are currently doing, or are thinking of taking A-levels, I would advise you that although they are good fun they require lots of hard work.
As a result of completing my A-levels (these are university entry exams) I have also left school. Although for me this is rather sad, it does mean that I shall have lots of time to develop my Linux ideas. Thus, over the holidays I am hopefully going to be teaching an evening class about using Linux. It is something that I am looking forward to.
But I don't wish to delve too much into the future. Going back to the world of computing one thing that happened recently which I found quite amusing was that a young computer cracker (age 19 years, whose name I cannot remember) from Wales (UK), had gotten a load of credit-card details and posted them onto another website. Amongst the credit-card details obtained was that of Bill Gates. This young cracker then used his credit-card, ordered a consignment of viagra, and sent it to Bill Gates!!!
You'd have thought that the Welshman would have had something better to do.........
The internet is growing at an alarming rate. Indeed, with nearly every ISP there is the opportunity of being able to publish your own web pages. The ability to do this is through the use of a computer (the host), and a webserver program such as Apache. Although there are other webservers, Apache is the most widely used on the internet and is the most stable.
"But why would you want to use it on a local machine?", I hear you cry. Well running the Apache httpd daemon on your Linux box means that it is a great way of storing information, especially if you have a lot of HTML pages. I happen to have Apache running because I have a local copy of all the LDP Howto's, and of course a copy of the Linux Gazette archives!!
So the first thing to do is to test whether or not you have Apache installed. If you are using a distribution that uses the RPM file format, type in the following:
rpm -qa | grep -i apache
If successful you should see a line similar to:
apache-1.3.12-95
This means that the Apache webserver has been installed. If you do not have Apache on your system then you must install it. Many distributions come with Apache so the chances are it is on your distribuion CD. If it is not, or your distribution does not support the rpm format, then you must download the source files in tarred/gzipped format (*.tar.gz) available from www.apache.org. Once you have downloaded the files you can usually install apache in the following way:
1. Log in as Root
2. Gunzip/untar the file:
tar xzvf /path/to/tarfile/apache*.tar.gz
3. cd to the newly created Apache directory:
cd Apache*
4. Run the "configure" script:
./configure
5. That will take a minute. Hopefully, that should be successful, and a makefile, called "Makefile" should exist in the directory. If not, it is likely that you do not have any compiler programs (such as C, C++, g++), or you header files, or kernel source files installed. It might also be possible that your make utility is not installed. If this is true then you must install them.
So once configure has finished the thing you have to do now is to "make" the file, by typing in the following:
make
This step may take some time, especially if you have an old machine.
Assuming there were no errors from the make, the last thing you have to do is to install the compiled files by typing:
make install
And hopefully that should have installed Apache. If you do encounter errors while installing/compiling Apache read the documentation that comes with it. One caveat that I will mention is that during the "make" process it is normal for the information to be echoed to the screen. If you find that you are getting repeated errors while compiling Apache, one work around is to issue the following command:
make -k all
The above command will force make to continue, even if it encounters errors en route. Although I only recommend using it as an absolute last resort. Invariably reading Apache's documentation should solve most compiler issues.
Now that everything has been installed the next thing to do is to start Apache. This is accomplished by starting the "httpd" daemon. By default (or at least for me anyway) Apache is automatically run during your run-level so if you have not already rebooted your machine type what follows still as user "root":
httpd
Hopefully your prompt should have been returned with nothing echoed to the screen. To check that the "httpd" daemon is running, we can use our old friend "ps", thus:
ps aux | grep -i httpd
What the above command does, is to list all the processes (including those that are not attached to a tty), and then filters the list (pipes "|") it to the grep command, which will match for the expression "apache". The switch -i ignores case sensitivity.
You should see a number of lines, but one which looks similar to the following:
wwwrun 1377 0.0 2.0 4132 1340 ? S 11:09 0:00 httpd
This means that Apache is up and running. If you find that the result of that command simply returns "root blah blah grep -i httpd" then you must run httpd again. If you keep getting the same message, switch to init 6
OK, now were are getting somewhere. Having ensured that the "httpd" daemon is active, we can actually start playing with it. Open up a copy of a Web browser (such as Netscape) and enter the following URL:
http://localhost
Hopefully you should see a web page of sorts. This usually differs between different Linux distributions. On my SuSE box I am presented with the SuSE Support Database with the SuSE chameleon mascot in the top middle of the page!
The page that you are looking at is the main page at the site "localhost". This page is stored in the following directory:
/usr/local/httpd/htdocs
This directory has a special name. It is called DocumentRoot.The actual path may vary slightly on some systems, but invariably it is similar to the above. In this directory you should notice some files, in particular *.html files. The file that is loaded when you go to "http://localhost/" is the file index.html. What I have done, is created a sub-directory in "htdocs" called "oldhtdocs", and copied all the files into it. That way, I can start afresh, and know that I have the originals if I need them.
You may find, that reading and writing to the DocumentRoot folder has been disallowed to non-root users. To get around this issue the following command as root, replacing "/path/to/htdocs" with the correct pathway:
chmod +rw /path/to/htdocs
Knowing now, where the files are located for "http://localhost/" is all very well, but how do you configure apache? Hang on there reader......the file you are looking for is called httpd.conf and is located usually in "/etc/httpd" or it maybe in the directory "/usr/local/apache". On SuSE and Mandrake systems, the latter is the default place. In the sections that follow I shall be using the "httpd.conf" file to carry out various customisations.
How many of you have gone to URL's that contain the tilde symbol (~) followed by a name and then a (/)? I would imagine that nearly everyone has, at sometime. But how many of you were aware of what it meant?? The tilde symbol within a URL indicates a "subdomain" that is owned by a user on the computer system, off the main domain name. Thus, at school, I had my own webserver, with a valid URL:
http://linuxservertom.purbeck.dorset.local/~thomas_adam/
What this was doing, was actually retrieving files stored in a special folder under the user account, of user "thomas_adam". This ability, gives users on a network, a space on which to house their own web pages. So how is all this achieved? Well, it is quite simple really....
All users, who are allowed their own webspace, have to be put in the group nogroup (or www-data under Debian, etc). This can be done, by editing the file "/etc/group" (as root), and locating the line for "nogroup". Then at the end of the line, add the users' name separated by a comma. Then save the file.
In a user's home directory, a directory called public_html has to be created, thus (as user root type):
cd /home/auser/ && mkdir public_html
Where "auser" is the name of a valid user on the system. Then the permissions have to be set. This is done by typing in the following:
chmod 755 /home/auser/public_html
Then the last thing to do, is to set the group of that newly created folder to nogroup. This can be done, by typing:
chown auser.nogroup /home/auser/public_html
Where "auser" is the name of the valid user.....substitute as appropriate. The same procedure can be applied to all users. It might also be an idea to play about with "useradd" so that when you add new users, the "public_html" directory with the permissions are set automatically.
[Actually, you don't have to do all that user and group
stuff, if you instead make sure the public_html directory and
all its files are world readable:
chmod -R a+r /home/auser/public_html
The important thing is that Apache has read access to the files. -- Mike Orr]
So the next thing to do, is to make sure that Apache is aware of what we have done. Open up the "httpd.conf" file, and lets take a look......
By default, I think that the configuration that tells the Apache about the public_html directive is commented out, or at least it was in mine. From the beginning of the document, search for the keyword UserDir. You should find something that looks like the following:
<IfModule mod_userdir.c>
    UserDir public_html
</IfModule>
If any of the above lines have a hash (#) symbol preceeding them, delete them. The above lines tell Apache that the directory "public_html" is to be used for html files for each user.
Directly below this are more related lines that tell apache what sort of restrictions to apply. In the case of the following lines they are read-only. If any of these are commented out, uncomment them.
<Directory /home/*/public_html>
    AllowOverride FileInfo AuthConfig Limit
    Options MultiViews Indexes SymLinksIfOwnerMatch IncludesNoExec
    <Limit GET POST OPTIONS PROPFIND>
        Order allow,deny
        Allow from all
    </Limit>
    <LimitExcept GET POST OPTIONS PROPFIND>
        Order deny,allow
        Deny from all
    </LimitExcept>
</Directory>
So now all that remains is to start to write the web pages. The only other thing which you will find extremely useful is that if you noticed my example earlier:
http://linuxservertom.purbeck.dorset.local/thomas_adam/
I had not specified a ".html" file to load. This is because I had already told Apache a default file to look for within it. Such a file is known as a DirectoryIndex, and you can specify default files to load. Locate the following in your "httpd.conf" file:
<IfModule mod_dir.c>
    DirectoryIndex index.html index.shtml lwm.html home.html
</IfModule>
What this is telling Apache is that when a URL is specified, such as the example above, with no extension file after it (*.htm*), then it will look for a default file(s) specified after the flag "DirectoryIndex". Thus in your "public_html" file, if there was a file called "index.html", then this would be loaded on default. You are able to specify multiple files as in my example above. If Apache cannot find anyone of the above files then the directory listing is displayed instead (unless you specify a file to load).
One thing that I would like to mention at this point, is if you have specified a hostname in "/etc/hosts", you can substitute that name in place of "http://localhost". It is for convienience that I use it here. Furthermore in "httpd.conf", I would recommend that you find the following flag and substitute localhost for the first part of your host name:
ServerName grangedairy
Thus my host name is grangedairy.laptop, I have simply put grangedairy. The reasons for doing this will become apparant from reading the Alias Section
The last thing you have to do is with any changes that you make to "httpd.conf", you have to stop and restart it. This can be achieved by typing in the following (as root):
killall httpd
httpd
In this section, I shall be covering the rather short topic of Aliases. Using the "httpd.conf" file, we can see a list of aliases if we search for the keyword "alias". Hopefully you should see a list which looks similar to the following:
Alias /howto        /usr/share/doc/howto/en/html/
Alias /mini           /usr/share/doc/howto/en/html/mini/
Alias /lg              /usr/share/doc/lg/
Alias /hilfe          /usr/share/doc/susehilf/
Alias /doc          /usr/share/doc/
Alias /cgi-bin-sdb  /usr/local/httpd/cgi-bin/
Alias /sdb               /usr/share/doc/sdb/
Alias /manual         /usr/share/doc/packages/apache/manual/
Alias /htdig            /opt/www/htdocs/htdig/
Alias /opt/kde/share/doc/HTML      /opt/kde/share/doc/HTML/
Alias /opt/gnome/share/gnome/help/ /opt/gnome/share/gnome/help/
Alias /errors/      /usr/local/httpd/errors/
Alias /icons/              /usr/local/httpd/icons/
Alias /admin        /usr/local/httpd/admin/
Alias /lwm                /usr/share/doc/lg/lwm/
As you can see, what the above is saying, is that if the URL ends in a "/howto" for example, then Apache is to get its web pages from the directory "/usr/share/doc/howto/en/html". Once again the default web page that it will load up is taken from DirectoryIndex, as we saw earlier.
http://grangedairy/howto
You may remember that earlier I had said that you should specify a ServerName flag in "httpd.conf". This was done so that when you typed in the URL with one of the above aliases, you do not need to put an extra forward slash at the end of the URL. You see, originally, the above aliases, were alised thus:
Alias /howto/        /usr/share/doc/howto/en/html/
Alias /mini/           /usr/share/doc/howto/en/html/mini/
with extra forward slashes after the alias name. I soon got tired of having to add this in myself and so I was able to tell Apache how to do this for me. By setting the ServerName flag apache now knows the name of my machine so that when I go to:
http://grangedairy/howto
It automatically appends the forward slash at the end. Cool, eh?? So if you have done the same as me you can delete the trailing forward slashes from the alias name because hopefully, you should not need them!
The final part to my Apache tutorial is how to set up and create "secure directories", i.e. those that require user authentication before they are loaded. You will have noticed earlier that in my listing examples of Aliases, there was one for "/admin". This is in fact a secure directory.
You can set up secure directories in the same way that you would an ordinary alias except this time, you have to tell Apache a little bit about the directory itself and how it is to be parsed. So say that you wanted to set up a secure directory mysecuredir, at location "/usr/local/httpd/mysecuredir/" You would do the following:
1. Add "/mysecuredir" to alias list:
alias /mysecuredir /usr/local/httpd/mysecuredir
2. Change to the location of the folder that you have specified in the alias list, thus:
cd /usr/local/httpd
3. Create the directory "mysecuredir" by typing in:
mkdir mysecuredir && cd mysecuredir
This has created the directory, and changed to it.
4. Now the work begins. There are two files that we shall be using .htaccess and htpasswd. The first file (.htaccess) is the one that we shall set up first. It is this file that will store the information about how the "mysecuredir" is to be used.
So at the console, use an editor such as nano (a pico clone), jed, emacs, etc, to create the .htaccess file, and enter the following information, exactly as shown because apache is case-sensitive in parsing commands!:
AuthType Basic
AuthName "Restricted Directory"
AuthUserFile /usr/local/httpd/admin/htpasswd
require valid-user
(Since ,htaccess starts with a period, it won't show up in ordinary directory listings. Use "ls -a" to see it.)
The commands above are the most common ones used to create a secure directory. The table below will give a short description of the commands and how you can customise them.
| Option Tag | Meaning |
|---|---|
| AuthType | This sets the authentication type. Basic is usally always used. |
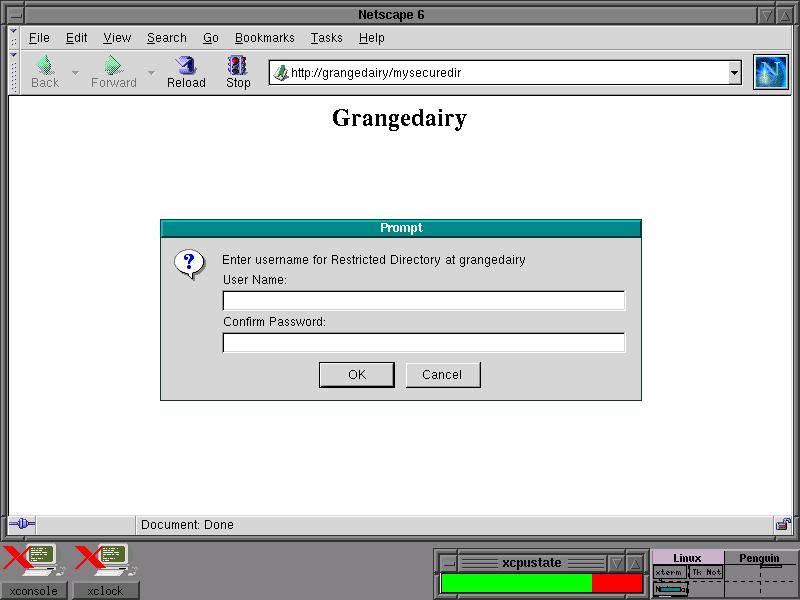
| AuthName | Sets the name on the "login" box of the directory that you are trying to connect to (see the screenshot below). |
| AuthUserFile | This is the file that is used to check for authentication, i.e. it stores your username and password (encrypted of course). You must ensure that you use the full path to the htpasswd file. |
| require valid-user | This says that access is only allowed to those who have a valid entry in the htpasswd file. |
Note: for additional security, put the htpasswd file somewhere that is not accessible via URL--somewhere outside your web directory and outside your alias directories. A .htaccess file must be in the URL-accessible directory it's protecting, but the htpasswd file may be anywhere. You may also share the same htpasswd file among several .htaccess directories if desired.
Ok, now that we have told apache how to handle the directory we now need to create the password file:
5. To create the htpasswd file you have to type in the following command (in the same directory as the ".htaccess" file:
htpasswd -c htpasswd username
Whereby you replace "username" with your username. To keep adding users to the file, issue the same command, but remove the "-c" flag.
6. Now edit our friend /etc/httpd/httpd.conf and at the bottom of the alias list, add the following:
<Directory /usr/local/httpd/*>
    AllowOverride AuthConfig
</Directory>
You may have to modify it slightly, but that will ensure that if apache meets any ".ht*" files it will use them to apply security on them. To turn off this, for the above, change AllowOverride AuthConfig to AllowOverride None.
Now stop and restart the httpd daemon
Ok now you are all set to try it out. Having saved the files go to your web browser and type in the following:
http://servername/mysecuredir
Making sure that you replace "servername" with either your hostname, or "localhost". If successful you should see a dialog box similar to this screenshot.
Once you have entered the correct details you should then be off and away. You may find however that you can connect to the "mysecure" directory without having to supply any credentials. If this happens, you need to check the following in your "/etc/httpd/httpd.conf" file.....
It may be that apache has not been configured to recognise the use of ".ht*" files. You can tell Apache to undo this, by setting the AccessFileName tag, thus:
AccessFileName .htaccessWell, that concludes this entire section. I did consider writing a few words about the use of perl and cgi, but I decided that Mark Nielsen has done a better job over the last few months. Furthermore, Ben Opoknik has been creating yet another excellent tutorial, this time on Perl, so if you are interested in cgi programming, I would start by reading these two series of articles :-)
I stumbled across this program quite by accident. I was originally doing some research at school for the acting network administrator (hi Dave!) which involved the use of power management, as we were having some problems with monitors "sleeping (room D25)" but I digress.....
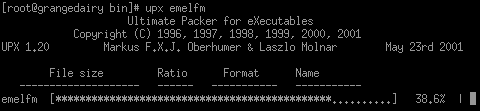
UPX (Ultimate Packer for eXecutables) is a compression program. What this program actually does, is
compress binary executable files which are self contained, and which do not slow down execution or memory
performance. A typical use for this type of program is best suited to laptop users, where harddrive space is of
enormous concern. Since I use my laptop for most things and only have a 3.2GB harddrive, I have found that
compressing the files stored in "/usr/bin" has cut the size of that directory in half!
Since it will only compress binary files, it is no good trying to compress the files stored in "/etc" for example. I have found that compressing the following directories is ok:
/usr/bin
/usr/X11R6/bin
/usr/local/bin
One caveat that I should mention, is that I would NEVER use "upx" to compress the files stored in both "/bin" and "/usr/sbin" When I rebooted my computer, I found that Init would not run. Out came "Tom's root/boot" and I later discovered that the compression of these files was causing the main Init program problems for some reason........
So to use the program, download the package from http://wildsau.idv.uni-linz.ac.at/mfx/upx.html. I think you have the choice of either downloading the source packages, or a pre-compiled executable.
I simply downloaded the pre-compiled package, unpacked it, and copied the main upx program to "/usr/bin". then you are ready to start compressing files.
To compress a file, you have to type in the following:
upx /path/to/program/progname
and that will compress the program specified. You can also compress all files in the directory, by typing:
upx /path/to/programs/*
and UPX will happily go through all files, and instantly disregard those which are not Linux/386 format.
Here's a screenshot of UPX in action.
To decompress files, you have to use the "-d" flag, thus:
upx -d /path/to/prog/*
A common list of command-line options, are:
Usage: upx [-123456789dlthVL] [-qvfk] [-o file] file..

Commands:
  -1     compress faster                   -9    compress better
  --best compress best (can be very slow for big files)
  -d     decompress                        -l    list compressed file
  -t     test compressed file              -V    display version number
  -h     give this help                    -L    display software license

Options:
  -q     be quiet                          -v    be verbose
  -oFILE write output to `FILE'
  -f     force compression of suspicious files
  --no-color, --mono, --color, --no-progress   change look

Backup options:
  -k, --backup        keep backup files
  --no-backup         no backup files [default]

Overlay options:
  --overlay=copy      copy any extra data attached to the file [default]
  --overlay=strip     strip any extra data attached to the file [dangerous]
  --overlay=skip      don't compress a file with an overlay
Overall, the performance of the compressed files have been ok, and I have not noticed any loss in functionality. The only program that did take a long time to load up once it had been compressed was netscape but that did not bother me too much (netscape uses so much memory, I am used to waiting for it to load).
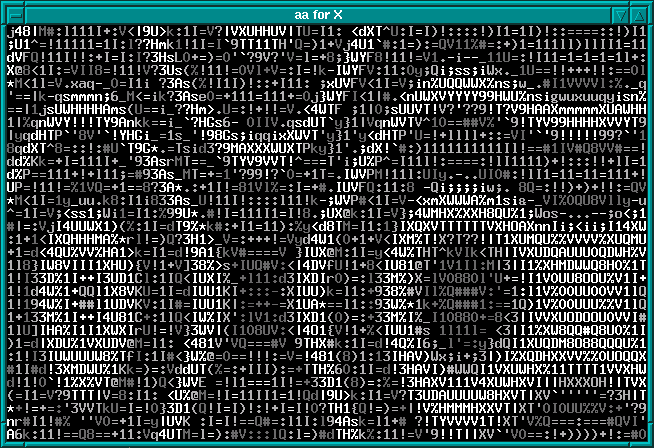
In issue 67 of the Linux Gazette, Mike Orr, reviewed cowsay/cowthink, a configurable talking cow that displays messages in speech bubbles. Everything is written in Perl (my second-favourite scripting language, after bash) and is displayed in ASCII. I was so impressed with the cows that I decided to look for more ASCII programs. Out came my SuSE distribution CD's and I found the program bb.......
bb is a fully-working ASCII demo, which uses ANSI C and is SVGA compatible. bb makes use of the aa_lib package (ASCII art library) so you will have to install it along with the main package. The demo produces a range of different simulated pictures, from random tumbling characters (going through different shades of grey), to an ASCII simulated mandlebrot fractual!! (which incidentially inspired the colour version of Xaos).
You can get bb from ftp://ftp.bonn.linux.de/pub/misc/bb-1.2.tar.gz.
bb used to have a home page, but unfortunately it's gone. However, project aa (the ASCII Art library) is what bb is based on, and it has a home page at http://aa-project.sourceforge.net/. The aa page also discusses aview (an ASCII art viewer), aatv (to view TV programs on your text console), ttyquake (a text version of Quake), Dumb (a Doom clone), apron (an mpeg1 player), and other programs. ttyquake does require the graphical Quake to be installed, so it uses the original Quake game files. One commentator writes of ttyquake, "people are starving to death in this world... and somebody had time for this....."
bb is best run from the console, but it can be run from within an X-terminal window, as shown by this screenshot.
The valid command-line options for bb are:
Usage: bb [aaoptions] [number]

Options:
  -loop          play demo in infinite loop

AAlib options:
  -driver        select driver
                  available drivers:linux curses X11 stdout stderr
  -kbddriver     select keyboard driver
                  available drivers:curses X11 stdin
  -mousedriver     select mouse driver
                  available drivers:X11 gpm cursesdos

Size options:
  -width         set width
  -height        set height
  -minwidth      set minimal width
  -minheight     set minimal height
  -maxwidth      set maximal width
  -maxheight     set maximal height
  -recwidth      set recomended width
  -recheight     set recomended height

Attributes:
  -dim           enable usage of dim (half bright) attribute
  -bold          enable usage of bold (double bright) attribute
  -reverse       enable usage of reverse attribute
  -normal        enable usage of normal attribute
  -boldfont      enable usage of boldfont attrubute
  -no<attr>      disable (i.e -nobold)

Font rendering options:
  -extended      use all 256 characters
  -eight         use eight bit ascii
  -font <font>   select font(This option have effect just on hardwares
                  where aalib is unable to determine current font
                  available fonts:vga8 vga9 mda14 vga14 X8x13 X8x16
                  X8x13bold vgagl8 line

Rendering options:
  -inverse       enable inverse rendering
  -noinverse     disable inverse rendering
  -bright <val>  set bright (0-255)
  -contrast <val> set contrast (0-255)
  -gamma %lt;val>   set gamma correction value(0-1)

Ditherng options:
  -nodither      disable dithering
  -floyd_steinberg floyd steinberg dithering
  -error_distribution error distribution dithering
  -random <val>  set random dithering value(0-inf)
Monitor parameters:
  -dimmul <val>  multiply factor for dim color (5.3)
  -boldmul <val> multiply factor for dim color (2.7)
  The default parameters are set to fit my monitor (15" goldstar)
  With contrast set to maximum and bright set to make black black
  This values depends at quality of your monitor (and setting of controls
  Defaultd settings should be OK for most PC monitors. But ideal monitor
  Needs dimmul=1.71 boldmul=1.43. For example monitor used by SGI is very
  close to this values. Also old 14" vga monitors needs higher values.
I really do think that if you're into ASCII art, you should give this demo a go. It lasts for approximately 5 minutes.
Well, you've made it to the end of this months article. Looking ahead to next month, I am going to be writing an article about how to write efficient manual pages (anyone remember groff processing??) and whatever else I can think of. However it would be nice to hear from anyone who has article suggestions, as I am running out of ideas.....slowly. If there is anything you feel would be good to include in the LWM, drop me a note :-)
Also, in case anyone is interested, all the screenshots that have appeared in this document, have been using made using the "GNU Image Manipulation Program" and are of the FVWM2 window manager, running the M4 preprocessor AnotherLevel.
As a final notice, I would like to say that as I am no longer at school anymore, my "n6tadam@users.purbeck. dorset.sch.uk" account is invalid, and I now have a new account (see below).
So until next time....happy linuxing!
 |
Send Your Comments | |
Any comments, suggestions, ideas, etc can be mailed to me by clicking the e-mail address link below: