
Measuring Congestion Windows of TCP Senders
My last two articles (1, 2) described the mechanism of TCP congestion control and how the Linux kernel implements it. In order to gain access to the parameters of a TCP connection, I introduced a daemon written in C that accepts a TCP stream's data and periodically writes the parameters of the TCP connection to a file; that took care of the receiver. The sender side, however, is still missing, so we'll turn our attention to that last piece in the puzzle.
Every Line Has Two Ends
Everyone who has ever been involved in networking knows that a data
transmission such as a TCP stream has two ends: you always have a sender
and a receiver, regardless of how asymmetric your data transfer may be.
The receiver has to adjust its window in order to efficiently handle
data reception. At the same time, the sender has to estimate how many
packets can be sent without seeing any acknowledgement of proper
reception. These two TCP parameters do not necessarily change equally.
First of all, there might be different operating systems involved. This
means that two different TCP/IP stacks talk to each other, with both
sides having their own ideas on how to evaluate the quality of the data
link. Then, there are the different TCP congestion algorithms, with some
of them being valid only for the sender, and not for the receiver.
We will now concentrate on the sender side, and insert some code to look
at the TCP connection. We do this in the same way we did for the
receiver. Our C program will get a lot easier, since we don't need to
write a daemon process - we just need a client that grabs some data,
opens a connection to the receiver, and starts sending packets.
Writing a TCP Sender
Again, before writing code, you should always have a rough idea what you want to accomplish. Programming is nothing more than compiling a list of things to think about (which also means that people thinking in very complex ways may have to write more code). Investing some time into a plan can save you a lot of frustrating hours, later, when coding your ideas. Basically a TCP sender should do the following.
- Open a TCP socket to the receiver.
- Open a file to write the TCP parameters to.
- Start a loop that sends the given data payload.
- Periodically check the kernel's tcp_info structure and save interesting values.
- Close TCP socket and close the output file.
There we go; it's a lot simpler than the last example code. With regard to the data payload, you can either create the data in the program by using random values (or counters), or you can read a file and send it to the TCP socket. I decided to do the latter, since it's closer to real life. Of course, this means that you have to take disk I/O into account, when dealing with very fast network links such as gigabit Ethernet: if the disk subsystem can't keep up with the network interface card, it will most certainly have an impact on the performance of your TCP transmission.
Just as in the daemon code, we will have to set a byte limit on the chunks we put on the network. This will also suggest the rate at which we should copy the TCP parameters to our statistics file. We'll read the data in the tcp_info structure every n bytes.
Connecting to the Receiver
The connection consists of multiple steps. First of all, we need a TCP socket:
tcp_socket = socket( PF_INET, SOCK_STREAM, IPPROTO_TCP );
if ( tcp_socket == -1 ) {
    fprintf(stderr,"Could not open TCP socket: %s\n",strerror(errno));
    exit(EXIT_FAILURE);
}
We will use this socket for our data transmission. In contrast to the code of our receiver, we only need a single socket and some appropriate options. There is one particular option that might make some sense; I found it after doing some test runs of the code. Whenever the sender has sent all the data but the receiver hasn't yet received all packets, there is no reason for the sender to keep the TCP socket open: all packets are managed by the kernel, and the application can't do much other than waiting or checking the socket for errors. If you want the socket to last a bit longer than the time needed to copy the payload to the buffers, you can set the SO_LINGER option with a call to setsockopt(). You'll also have to prepare a variable of type struct linger, and load it with the options used by SO_LINGER. We'll enable the option, and set the timer to 13 seconds, meaning the socket will close 13 seconds after the last packet was given to the kernel for transmission.
lingeropt.l_onoff  = 1;
lingeropt.l_linger = 13;
if ( setsockopt( tcp_socket, SOL_SOCKET, SO_LINGER,
                 (void *)&lingeropt, sizeof(lingeropt) ) == -1 ) {
    fprintf(stderr,"Could not set SO_LINGER option: %s\n\\"
                   "Closing the socket will happen in the background.\n",strerror(errno));
}
Note that we continue if this option cannot be set: I used it as an
example of how to properly set socket options. SO_LINGER isn't that
important for what we have in mind, so we'll make that option
optional.
Now we have all we need, and can connect to the server on a specific
port. How do we do that? The user could have provided the server's
address either as a numerical IP or as a name that has to be resolved
via DNS, so we have to convert this into something suitable for the call
to connect(). Fortunately, the GNU C Library can do this for
us. The function gethostbyname() addresses all our needs: it
returns a pointer to a hostent structure containing the
server's address in decoded form.
server = gethostbyname( opt_server );
if ( server == NULL ) {
    fprintf(stderr,"Could not resolve server name!\n");
    exit(EXIT_FAILURE);
}
The last thing we need to do is prepare and issue a call to connect(). We do this by copying the data returned by gethostbyname() to a structure of type sockaddr. The only information still missing is the port number, so we convert it to network byte order and write it to the structure. Now, we can connect to the receiver.
server_address.sin_family = AF_INET;
memcpy( &server_address.sin_addr.s_addr, server->h_addr, server->h_length );
server_address.sin_port = htons(opt_port);
if ( connect( tcp_socket, (struct sockaddr *)&server_address, sizeof(server_address) ) == -1 ) {
    fprintf(stderr,"Could not connect to server: %s\n",strerror(errno));
    exit(EXIT_FAILURE);
}
The client is ready to send the data.
Mapping a File to Memory
The next step is to prepare the data payload. I already talked about sending a file to the receiver; we have two options for this, after opening a file descriptor.
- Read n bytes from the file, copy them into a buffer, put them on the network and read the TCP parameters.
- Map the file to a memory region, move along this region copying data to the network and read the TCP parameters every n bytes.
The second method is more convenient. Working with pointers to memory regions is quite common in C code. Mapping a file to a memory region saves you a lot of trouble compared to allocating a temporary buffer, and lets you do fewer copy operations on the payload. The Linux kernel deals with the memory mapping and the timely buffering of file content. The only thing we have to tell the kernel is the file descriptor and the size of the memory region in bytes. Both can be easily obtained. I wrote a small function that returns the file size of the file belonging to a descriptor.
unsigned int get_filesize( int fd ) {
    struct stat s;

    if ( fstat( fd, &s ) == 0 ) {
        return(s.st_size);
    }
    else {
        return(0);
    }
}
After the preparation of the descriptor and the size, the memory map can be done by a simple call to mmap().
datafd = open( opt_data, O_RDONLY );
if ( datafd == -1 ) {
    fprintf(stderr,"Could not open file '%s'! (%s)\n", opt_data, strerror(errno) );
    exit(EXIT_FAILURE);
}
else {
    opt_counter = get_filesize(datafd);
    data = mmap( 0, opt_counter, PROT_READ, MAP_PRIVATE | MAP_NORESERVE, datafd, 0 );
    if ( data == MAP_FAILED ) {
        fprintf(stderr,"Can't map file '%s' to memory! (%s)\n", opt_data, strerror(errno) );
        close( datafd );
        close( tcp_socket );
    }
}
You can tell mmap() what you intend to do with the memory region; in our case, read operations are sufficient. That's why we set PROT_READ as an 'advise' for the kernel and the Memory Management Unit (MMU). MAP_PRIVATE creates a private region and makes sure that changes to the mapped memory won't end up in the file - all we want to do is read the file, but setting this option doesn't do any harm. Likewise, the MAP_NORESERVE flag tells the kernel that the mapped region doesn't need to be backed by swap space; we don't want to do write operations, so we don't need any buffering for the memory pages. The data pointer points to the start of the file mapped to memory; we can use this as a starting point, and walk through the memory accessing the whole file. The Linux kernel reads the appropriate data blocks automatically. If you want to make the kernel's job easier, you can tell it what you intend to do with the mapped region - the madvise() function is useful for this. We're not going to use it here, but you should look it up in the man pages, since it's quite handy for other scenarios.
Writing the Data Payload
Everything is now set up. All we need to do is to move along the mapped file, send data to the network, and log the TCP parameters. We'll reuse the timer functions from the daemon code. (Good programmers are efficiently lazy.) We'll also copy the same set of parameters from the tcp_info structure, in order to make our result comparable to the one from the daemon code.
/* position is our pointer to the current position in the data buffer. This is
 * only important when streaming a file since we have to move along the mmapped
 * memory region in steps of opt_counter bytes.
 */
position = data;
/* Stopwatch time. */
get_now( &time_start, 1 );
while ( bytecounter <= opt_counter ) {
    /* Send first portion of data */
    if ( send( tcp_socket, position, opt_buffer, 0 ) == -1 ) {
        fprintf(stderr,"Error '%s' while sending %u bytes.\n", strerror(errno), opt_buffer );
    }
    /* Move the position pointer. */
    position += opt_buffer;
    bytecounter += opt_buffer;
    /* Measure time in order to create time intervals. */
    get_now( &time_now, 1 );
    /* Get struct tcp_info and extract parameters. */
    tcp_info_length = sizeof(tcp_info);
    if ( getsockopt( tcp_socket, SOL_TCP, TCP_INFO, (void *)&tcp_info, (socklen_t *)&tcp_info_length ) == 0 ) {
        /* Write parameters to file. */
        if ( opt_debug > 0 ) {
            fprintf(stdout,"Wrote line to log file after %u bytes sent.\n", bytecounter );
        }
        fprintf(statistics,"%.6f %u %u %u %u %u %u %u %u %u %u %u %u\n",
                time_to_seconds( &time_start, &time_now ),
                tcp_info.tcpi_last_data_sent,
                tcp_info.tcpi_last_data_recv,
                tcp_info.tcpi_snd_cwnd,
                tcp_info.tcpi_snd_ssthresh,
                tcp_info.tcpi_rcv_ssthresh,
                tcp_info.tcpi_rtt,
                tcp_info.tcpi_rttvar,
                tcp_info.tcpi_unacked,
                tcp_info.tcpi_sacked,
                tcp_info.tcpi_lost,
                tcp_info.tcpi_retrans,
                tcp_info.tcpi_fackets
               );
    }
}
First, we copy the data pointer to a work pointer named position. Next, we start taking the time in order to create relative time stamps - just as we did in the receiver's code. The send() function is used to copy a certain number of bytes to the network; thanks to mmap(), we don't need to copy data from and to different buffers - instead, we simply tell the function the position and the number of bytes to transmit (stored in opt_buffer). After that, we increment the byte counter and the work pointer. We then add a constant value, which may lead to sending more bytes than the actual size of the file. A cleaner way is to check for the immediate end of the payload memory region, and increment the counters by the number of bytes left until the end of the file. Keep this in mind, when comparing the number of bytes transmitted and received.
The remaining code deals with extracting the TCP parameters, and writing everything to the log file. The call to fprintf() is the same as on the receiver side. For your convenience, I've attached the full source, the header file (which is the same as for the daemon code) and a simple Makefile to this article. The code snippets above are only the crucial parts of the code; all the other administrative operations such as parsing the options and allocating and freeing resources are in the full source code. In addition, I have added a part that uses pseudorandom numbers instead of the content of a file as payload.
Testing the Code
Our little tool is now able not only to read the thresholds on the congestion window size, but also to read the congestion window itself. You can test this with almost any network connection. However, the congestion window rises significantly only if there is a bottleneck between sender and receiver. Under "normal" circumstances, the congestion window won't change much, and won't reach high values. I used my 512 kbit/s Internet connection at home for some test transfers to a machine in the office. The receiver should have a TCP sink running.
luchs@receiver:~$ ./tcpsnoop -d -f tcpsnoop_receiver.log -p 12345 -b 4096
You can then use tcpshoot for the data transfers.
luchs@sender:~$ ./tcpshoot -b 4096 -c 512000 -f tcpshoot_sender.log -p 12345 -s 10.0.0.1
I did this multiple times, and picked three transmissions for plotting
them with Gnuplot. The blue graph is the transmission of the example
above, in which I wrote 512000 bytes to the receiver. The green line
denotes the same command, but with 1048576 bytes (1 MB) of data. The
transfer take roughly double the amount of time. The window quickly
rises and falls again. The red line is the transmission of 512000 bytes,
again, but this time during a download of a 6 MB file. You can see that
the congestion window rises more slowly and, of course, that the data
transfer takes longer. 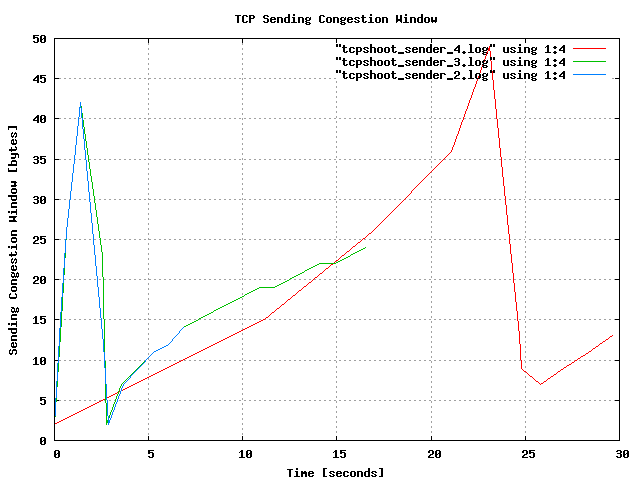
Again, I'll emphasize this, just as I did in my last article: The graph above doesn't prove anything beside the fact that my Linux kernel and my Internet connection are working; it is intended as a simple demonstration of two little tools we have written. It is now up to you to use them in controlled setups with bottlenecks and TCP pipes that allow the TCP algorithms to unfold their capabilities. If you find some interesting behaviour of TCP streams, some setups worth sharing with the world, or have created better graphs than mine, please let Linux Gazette readers know.
Useful links
Talkback: Discuss this article with The Answer Gang

René was born in the year of Atari's founding and the release of the game Pong. Since his early youth he started taking things apart to see how they work. He couldn't even pass construction sites without looking for electrical wires that might seem interesting. The interest in computing began when his grandfather bought him a 4-bit microcontroller with 256 byte RAM and a 4096 byte operating system, forcing him to learn assembler before any other language.
After finishing school he went to university in order to study physics. He then collected experiences with a C64, a C128, two Amigas, DEC's Ultrix, OpenVMS and finally GNU/Linux on a PC in 1997. He is using Linux since this day and still likes to take things apart und put them together again. Freedom of tinkering brought him close to the Free Software movement, where he puts some effort into the right to understand how things work. He is also involved with civil liberty groups focusing on digital rights.
Since 1999 he is offering his skills as a freelancer. His main activities include system/network administration, scripting and consulting. In 2001 he started to give lectures on computer security at the Technikum Wien. Apart from staring into computer monitors, inspecting hardware and talking to network equipment he is fond of scuba diving, writing, or photographing with his digital camera. He would like to have a go at storytelling and roleplaying again as soon as he finds some more spare time on his backup devices.
