
Getting Started with Linux Mint
By Shane Lazar
This is my second article aimed at new users of the Linux Mint distribution. My first article is on installing a dual-boot setup with Linux Mint and Windows XP. In this article, I would like to talk you through some basic things one should know about using Linux Mint, and generally just help you be productive in your new OS environment. I am going to direct my articles toward a single home PC connected to the Internet, with multiple users.
Although the desktop environment in modern day Linux is intuitive and more or less easy to navigate through, for someone coming from Windows XP, we must keep in mind that the two OSs are different at the 'roots', even though at the surface they may seem similar. At first, the way somethings are done in Linux might seem quirky.
One immediate difference you will notice is that Linux always asks you for an administrator's password when performing changes to the system. This may seem like an annoyance coming from Windows, but it is to make sure nobody makes changes that could break your system, including the administrator (by accident of course) and malicious software. However, to ease things up a bit, once entered, Linux Mint will maintain administrator mode for 15 minutes, and will not ask you for the password in this period. The administrator is the user you created during the installation.
I urge you to persevere a little, as once you have set everything up, you will not be asked for the password unless system changes are required. As you use Linux, you will (at least I did) realize that Linux today is an easy, secure, and convenient solution for your computing needs. Let us move on, to using Linux Mint.
mintMenu

Your primary interaction with your computer is the menu at the bottom left labeled 'Bianca'. This menu (mintMenu) is unique to Linux Mint, and I must say they have developed a very easy and efficient menu system. The menu has been neatly divided into three sections: Places, System, and Applications.
The items under Places logically opens the file manager, Nautilus, in the respective locations.
System houses the Application Installer (Synaptic Package Manager), the Control Center (mintConfig), Terminal, Lock, and Quit dialogues. I shall expand on some of these, later.
The Applications section, in true Linux tradition, groups applications according to their use. This, in my eyes, has always been a plus point for Linux over Windows: a very simple idea, but very effective. Also, newly installed applications are automatically placed in their respective categories. In keeping with simplicity, most application names are simplified with their use in mind, e.g., Movie Player, which is actually Totem Movie Player.
A brilliant touch to mintMenu is the search field at the bottom. When you enter text here, the list of applications is filtered, finding what you are looking for. If you know what application you are looking for, you could type its name, Firefox, for example. However, if you don't know the name of the application, you could also type the task you wish to perform! For example, typing hardware gives you Device Manager, command gives you Terminal, spreadsheet gives you OpenOffice Calc, etc. Although it is not all-inclusive, it is a handy feature for newcomers.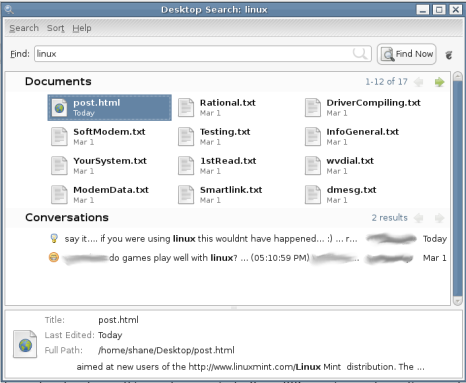
Further, entering something and then hitting Enter opens the search application and searches your home folder for the string you have entered, even searching inside documents, logged IM conversations, contacts, and more. This uses an indexing service called Beagle that runs continuously in the background. I am not a big fan of such non-essential applications that run continuously in the background, and eliminate their need by organizing and naming my files properly. So, I usually turn Beagle off and use the command-line interface (CLI) -based search tool called slocate. However, I have seen situations when it can be useful, and I have used it before. Point being that it all boils down to choice.
Networking
In today's world, a computer not networked is like an airplane without wings: you're not going to get very far without networking. If your network is a wired Ethernet one with DHCP (automatically assigned IP addresses), Linux Mint should have already set everything up for you nicely. Some ISPs require you to configure a static IP address. You will need the following information about your connection: your IP address, Subnet mask, Gateway address, and DNS server address.
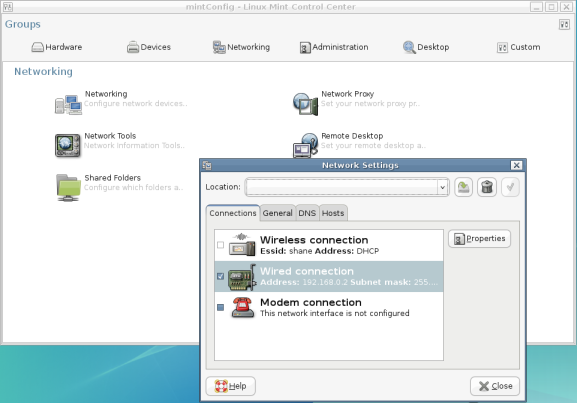
Open the Control Center, and click on the Networking button, which will take you to the page with the network configuration tools. Select the first tool labeled Networking. It will prompt you to enter the administrator's password. The tool opens with a tab displaying all your networking hardware. Select Wired connection, and click Properties.
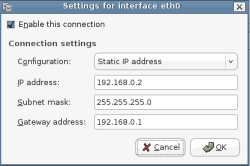
Set your connection as Static IP address from the drop-down list, enter the settings appropriately, tick Enable this connection, and accept the settings.
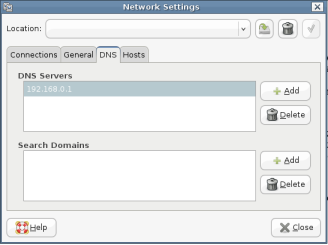
Then, select the DNS tab, enter your ISP's DNS server address in the first row, and hit Enter. Some ISPs may have more than one DNS server, and you can add them by clicking Add, which will create a second field for entering a DNS server. Repeat for other DNS servers. Click Close, and you should be done! Fire up Firefox, and try browsing your favorite Web site, or at least one that will be up for sure. My default is the Google homepage. If it does not work, you could try rebooting.
If you use a wireless connection, Linux Mint comes with a specialized configuration tool, mintWifi, and a comprehensive guide to get it working. Enter the following location in the Firefox address bar while in Linux Mint, to access this guide (file:///usr/lib/linuxmint/mintWifi/index.html). If you are relying on an internal dial-up modem for Internet access, then the solution is slightly more complicated: You can follow the Ubuntu HowTo to try and get it working. Linux's problem in this area is not due to its shortcomings, but rather the refusal of hardware manufacturers to provide drivers for them. This is why the community is fighting for open-sourced drivers. The dedicated Linux developers have even offered to make the drivers for free! Slowly but surely, the community is making advances in this field.
If you are still facing problems, do not hesitate to ask questions on the multitude of community-supported help sites. There is a forum that is supported by and dedicated to Linux Mint. See the links section at the top right of my blog for my favorite Linux forum. Friendly and helpful people abound in the Linux community and it is on the shoulders of these giants that Linux stands.
Updating
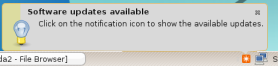
I am sure by now you have seen a little orange square and a pop-up, informing you that updates are available for Linux Mint. Until we got the network up and running, there was no way to update your OS. Since we've now got access to the Internet, we will proceed with updating.
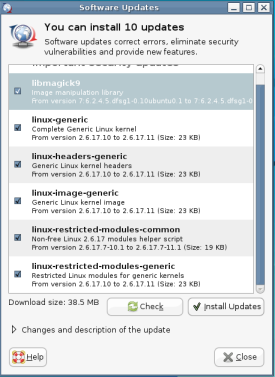
This is a no-brainer, and all it requires is clicking the orange icon and entering your administrator's password. This opens the Software Updates dialogue that shows you what updates are available, categorizes them according to importance, and tells you how big the download is. You have the option of deselecting updates, but, unless you are restricted by your Internet connection, it would be unwise to do so. Click Install Updates, and the application downloads, installs, and configures everything just right.
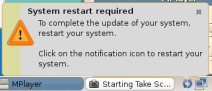
Sometimes, when core system updates are made, as is the case with the first Linux Mint update, you will be required to restart your computer for them to take effect. The Update Manager will inform you when this is necessary, and the orange icon is replaced with a blue reboot icon.
The beauty of the Update Manager is that it automatically keeps track of available updates without any input from you. When updates are available, you will get a visit from the little orange icon, and will have to follow the same steps. So, your system is always fitted with the latest versions of software, patches and fixes. As I said, it's a no-brainer!
Mounting Windows Partitions
Here, I am writing pretty much blind and from speculation. This is because I do not have Windows installed on my computer, as you may have gathered from my first article. I suppose Linux Mint mounts your Windows partitions during the install, and everything should be setup properly. The default mount points for the partitions are /media/hda1, /media/hda2, and so forth. Linux Mint also creates links to the partitions on your Desktop labeled hda1, hda2, etc.
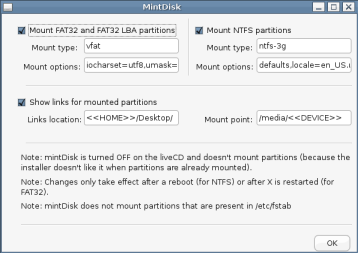
However, if your partitions are not mounted, a tool is provided that will enable you to do so. It is called mintDisk, and can be found in the menu under Applications > Administration or in the Control Center under the Hardware tab. Once you start mintDisk, you will be prompted for the administrator's password, and mintDisk opens up. There are fields available for configuring various options, but, unless you know what you are doing, it is better to leave them alone and simply click OK. If the partitions are not mounted immediately, they will be after the next reboot. Again, I apologize but I have no way of testing this, first hand.
mintDisk will mount your NTFS and FAT32 partitions with read and write permissions. Practically, what this means is that you will be able to browse, open, modify, create, or delete files and folders in your Windows partitions, i.e., you will have full access to them.
Installing NVIDIA and ATI Graphic Card Drivers
Both Windows XP and Linux Mint come with a wide range of drivers for various graphic cards. While these will give you basic functionality, in order to get the most out of 3D-accelerated cards you will need to install the drivers provided by the manufacturer. As you may know, the most popular graphic card manufacturers on the market today are NVIDIA and ATI. You will have to know which one you have (NVIDIA or ATI), in order to install the correct driver. If, like me, you have a low end graphics card, you will not need to install any other drivers as they are well supported with Open Source drivers. These low-end cards include SiS, Intel, and others that escape my memory right now - generally anything not NVIDIA or ATI. [1]
Since I do not have an NVIDIA or ATI card, I cannot give you a first-hand account of what you should do, but, apparently it is as simple as most of the other tools in Linux Mint, albeit a little different. The tool in question is Envy. Linux Mint (at the time of writing) comes with an older version (0.8.x). The newer version is way too easy to ignore, so I'll guide you as far as I can using that.
First, we will get the new version from the author's Web site. You can read through the brief description of Envy, to have an idea of what this brilliant tool does. Envy was written for Ubuntu, but since Linux Mint is dedicated to maintaining compatibility with Ubuntu, it will work fine. The download section follows the description of Envy (as shown in the screenshot). Linux Mint 2.2 Bianca is based on the latest version of Ubuntu, which is Ubuntu "Edgy Eft" 6.10. Simply go with the latest version of Ubuntu, since that is what Linux Mint is based on. Soon (April 2007), it will be Ubuntu "Feisty Fawn" 7.04.
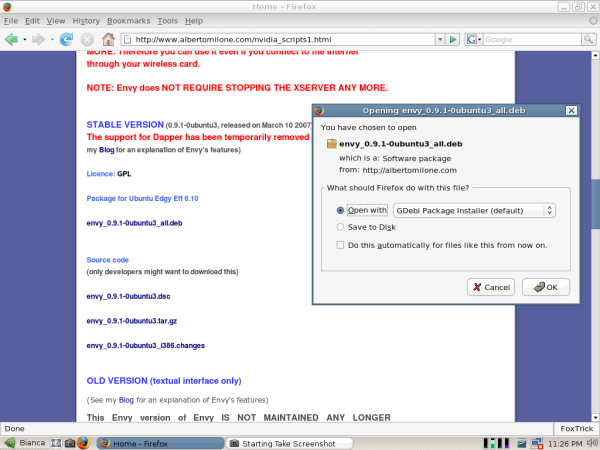
There are many downloads available, but you are looking for the latest *.deb file. At the moment, you will find it under Package for Ubuntu Edgy Eft 6.10. The file name (now) is envy_0.9.1-0ubuntu3_all.deb, but always go for the latest stable version. Click on the download, and Firefox will ask you what you want to do with it. Select Open with Gdebi Package Installer.
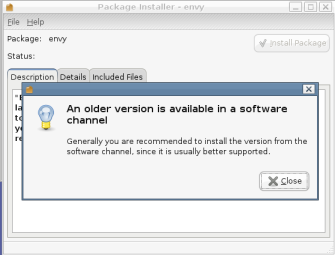
Once Gdebi opens it (administrator's password required), it will inform you that an older version is installed, and recommend you install software from the Linux Mint repositories. I would recommend the same, but we'll make an exception, this time: Close the dialogue, and click Install Package. Gdebi will then provide you with a list of required dependencies, which it will have to download. Accept to do so. When the installation is complete, close Gdebi.
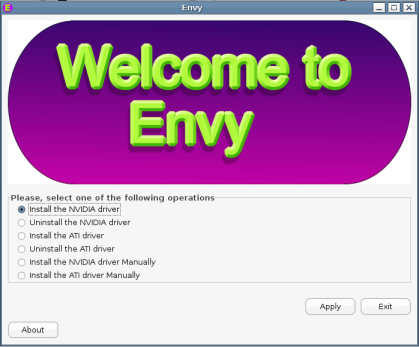
Now we run Envy. You will find it in the menu under Applications > System Tools, and it will require the administrator's password. Select Install the NVIDIA driver or Install the ATI driver, as appropriate for your graphics card. Click Apply. If I am not mistaken, everything should be handled 'automagically!' I am not sure, because I do not have the hardware, but Envy may ask you for some information such as your screen resolution, monitor specifications like frequencies, and the like. These you can get from your monitor's manual or run a quick Google search. When Envy provides you the option of restarting the X server, do so. This should take you back to the login screen, and you should see the NVIDIA or ATI logo before the login screen (unless things have changed since I had my Geforce2). If not, you could try rebooting.
Synaptic Package Manager
New users to Linux usually try to do things as they would in Windows. This is most often seen in program installation. Most go hunting on the Internet for sites from which to download software they need. Usually, they end up going to the project's homepage, downloading the tar.gz file, and then usually get stumped on installing it from the command line. Many a time they also run into what is known as dependency hell. On the contrary, application installation in Linux is meant to be painless, thanks to the plethora package managers available. Linux Mint uses Debian's apt-get package manager. Synaptic Package Manager is one of the available graphical user interfaces (GUI) of this powerful package manager.
Synaptic Package Manger is in the menu under the System section, and is labeled Install Software. To run it, you will need the administrator's password.
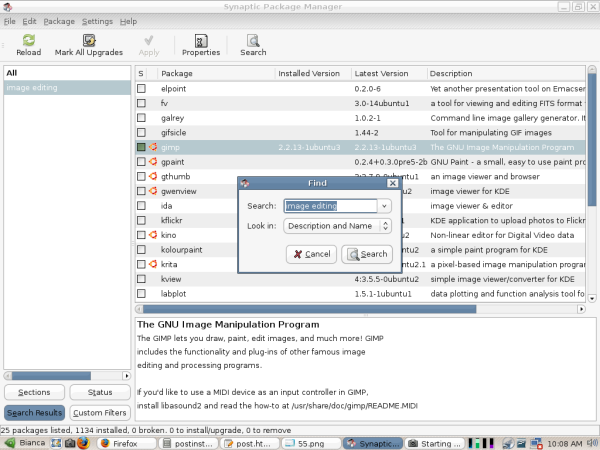
The interface is divided neatly into three fields: On the left, there is a list of categories of software, grouped according to various criteria. There are four grouping criteria, which can be selected by clicking on the buttons on the bottom left: Sections, Status, Search Results, and Custom Filters. The top-right field contains the list of packages in the category selected in the left field, and their status. The bottom-right field gives a short description of the package selected in the top right field. Synaptic Package Manager contains a database of all the packages available for Linux Mint, including those not installed on your system. Browsing through the database, you will see that the amount of free software available to do almost any task imaginable is truly mind-boggling!
The easiest way to find a an application or package is to use the search tool. Click the Search button, and a small dialogue opens with a field to enter your search term and a drop-down list telling it where to search. If you know what package you are looking for, select Name from the list, and run the search. If you want to perform a task but don't know what application you should install, select Description and Name from the list, and run the search.
For example, I needed an image editor to crop and resize the screenshots for this article. So I ran a search for image editing in Description and Name. This gave me a substantial list of matching packages. You will notice that some packages also have the Ubuntu logo next to them. This indicates that these packages are officially supported by Ubuntu, and will most probably work perfectly. Among the officially supported packages in my search result, the descriptions showed that the GIMP package is what suited what I was looking for, the most. (I confess, I knew that already....) Installing is just a matter of Right-clicking on the package and selecting Mark for Installation.
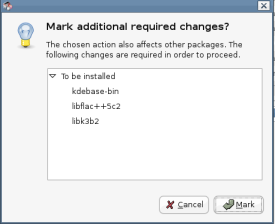
If additional packages are required, a dialogue opens, informing you what other changes are required for things to work properly. Click Mark to accept the other changes. You will see the package highlighted as marked for installation.
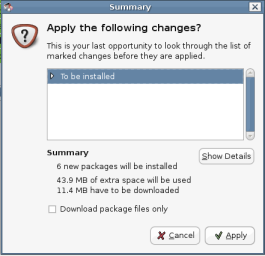
Then click Apply. A dialogue will open, which will give you a summary of changes to be made, including the total size of packages to be downloaded and the space that will be used by the installed packages. Click Apply again and wait for it to download, install, and configure everything for you.
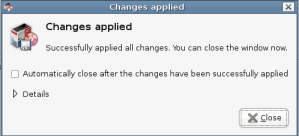
You will be informed when the installation is complete, and if there have been any errors. You can now close the package manager, and you will find your newly installed application in the menu, under Graphics in the case of GIMP. Simple, isn't it!
If everything has gone well so far, you now have a computer running a pretty, stable, secure, convenient, and free OS:
- equipped with a wide range of software for all common computing tasks
- with access to the Internet,
- updated with the latest software, patches and fixes,
- with full access to your Windows partitions,
- with the latest and best drivers for your graphics cards, and
- with the knowledge to install any other application you may need.
This basic setup should have you well on your way to being productive in your new Linux desktop. In my next article, I will talk about some of the most commonly used applications, fine-tuning, and enhancing your experience in Linux. Till next time, take care, and be nice!
[1] Rick Moen comments: The utility and necessity of ATI and Nvidia's proprietary drivers are frequently overstated, innocently by most commentators, and less so by that driver software's core constituency. That core constituency has to date comprised 3D gamers (majority), scientists and animators using 3D for various types of 3D modeling (minority) and miscellaneous desktop users experimenting with 3D desktop effects such as provided by the quite flashy Compiz and Beryl 3D window managers (small minority).
Utility: As noted above. It's important to note that no video chipset, from any manufacturer, in any way requires proprietary drivers for regular everyday X11 desktop functions, including all regular applications including graphics, desktop publishing, etc. A combination of 3D-capable video hardware and 3D-capable drivers are required only for the rather specialised uses described previously.
To be blunt, aside from having found Compiz/Beryl screen-rolling visual effects cute and appealing for about the first half-hour, I personally could go the rest of my life without 3D cabilities in my X11 sessions, and not miss them at all -- and I strongly suspect that will likewise be true of almost all Linux users, for some time to come. Also, avoiding having some hardware manufacturer's un-auditable binary-only proprietary drivers running in my systems' kernelspace leads immediately to a huge gain in system reliability and security. (Note that the Linux kernel's "taint flag" was developed in response to the Linux kernel mailing list being swamped with bug reports ultimately traceable to buggy Nvidia kernel drivers: deployment of the "taint flag" enabled kernel coders to ignore problem reports from all such users, and they consistently now do so.)
Necessity: An increasingly significant number of graphics chips from non-ATI/Nvidia manufacturers, notably the Intel i965 chip series, have lately been able to achieve quite respectable 3D framerates using entirely open source drivers/libraries (X.org and Mesa, or Xgl) -- because those manufacturers, unlike ATI and Nvidia, cooperate with the open source community. Additionally, and almost never mentioned by the proprietary drivers' proponents, entirely open source 3D works for most ATI R2x0 and R3x0 chips, and a project is underway to do likewise for Nvidia chips. See http://dri.freedesktop.org/ and http://nouveau.freedesktop.org/ for details.
Discussion of 3D on Linux was for years -- again, to be blunt -- relegated mostly to 3D gamers, especially during the 2000-2004 economic downturn when gamers were practically the only people buying new hardware. It's past time for the open source community to take the subject back, and correct the misperception that proprietary drivers are broadly necessary and desirable. They are neither.
Talkback: Discuss this article with The Answer Gang
![[picture]](../gx/authors/lazar.jpg) Shane is a Medical Resident in Romania. He has been a ardent user of FOSS and Linux since 2004. He spends a sizeable amount of time on Linux forums learning about it and helping others where he can. Currently his favorite distro is Ubuntu, while he has used Mandrake/Mandriva in the past on his desktop and still does for his home network server.
Shane is a Medical Resident in Romania. He has been a ardent user of FOSS and Linux since 2004. He spends a sizeable amount of time on Linux forums learning about it and helping others where he can. Currently his favorite distro is Ubuntu, while he has used Mandrake/Mandriva in the past on his desktop and still does for his home network server.
